Page2: Model Railroad Layout Location Chosen
But how much model railroad layout will fit the available space?
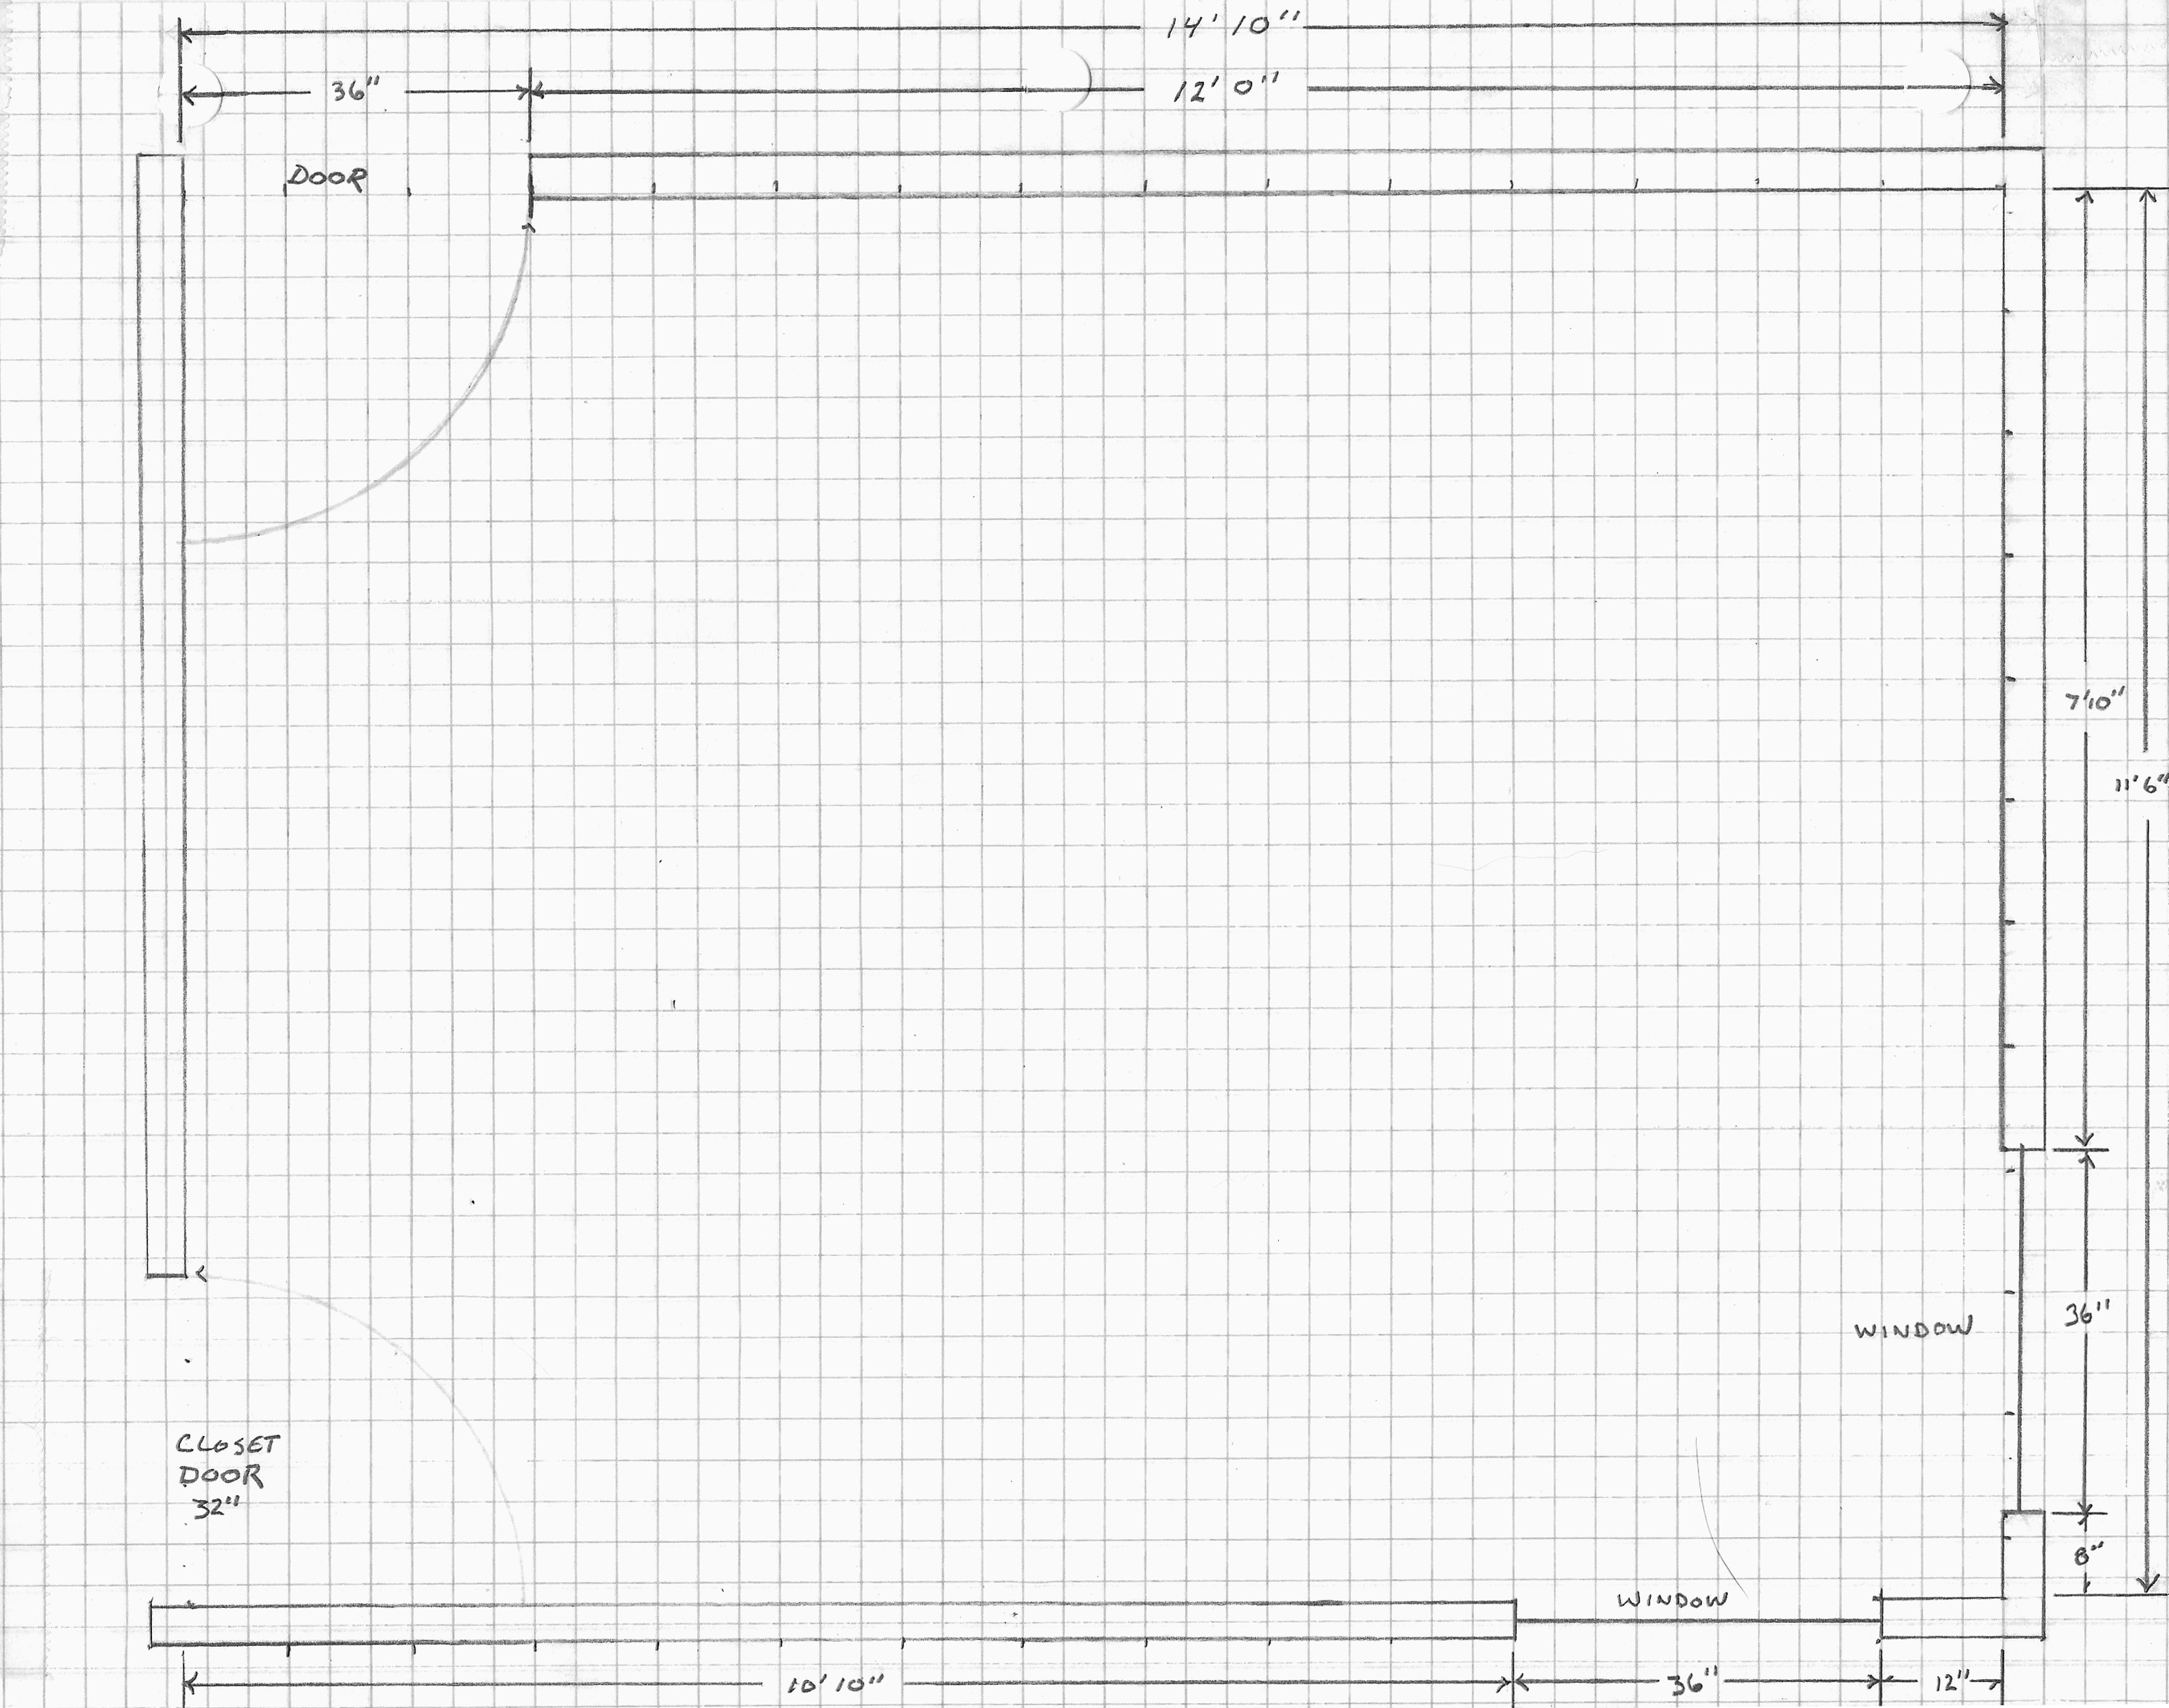
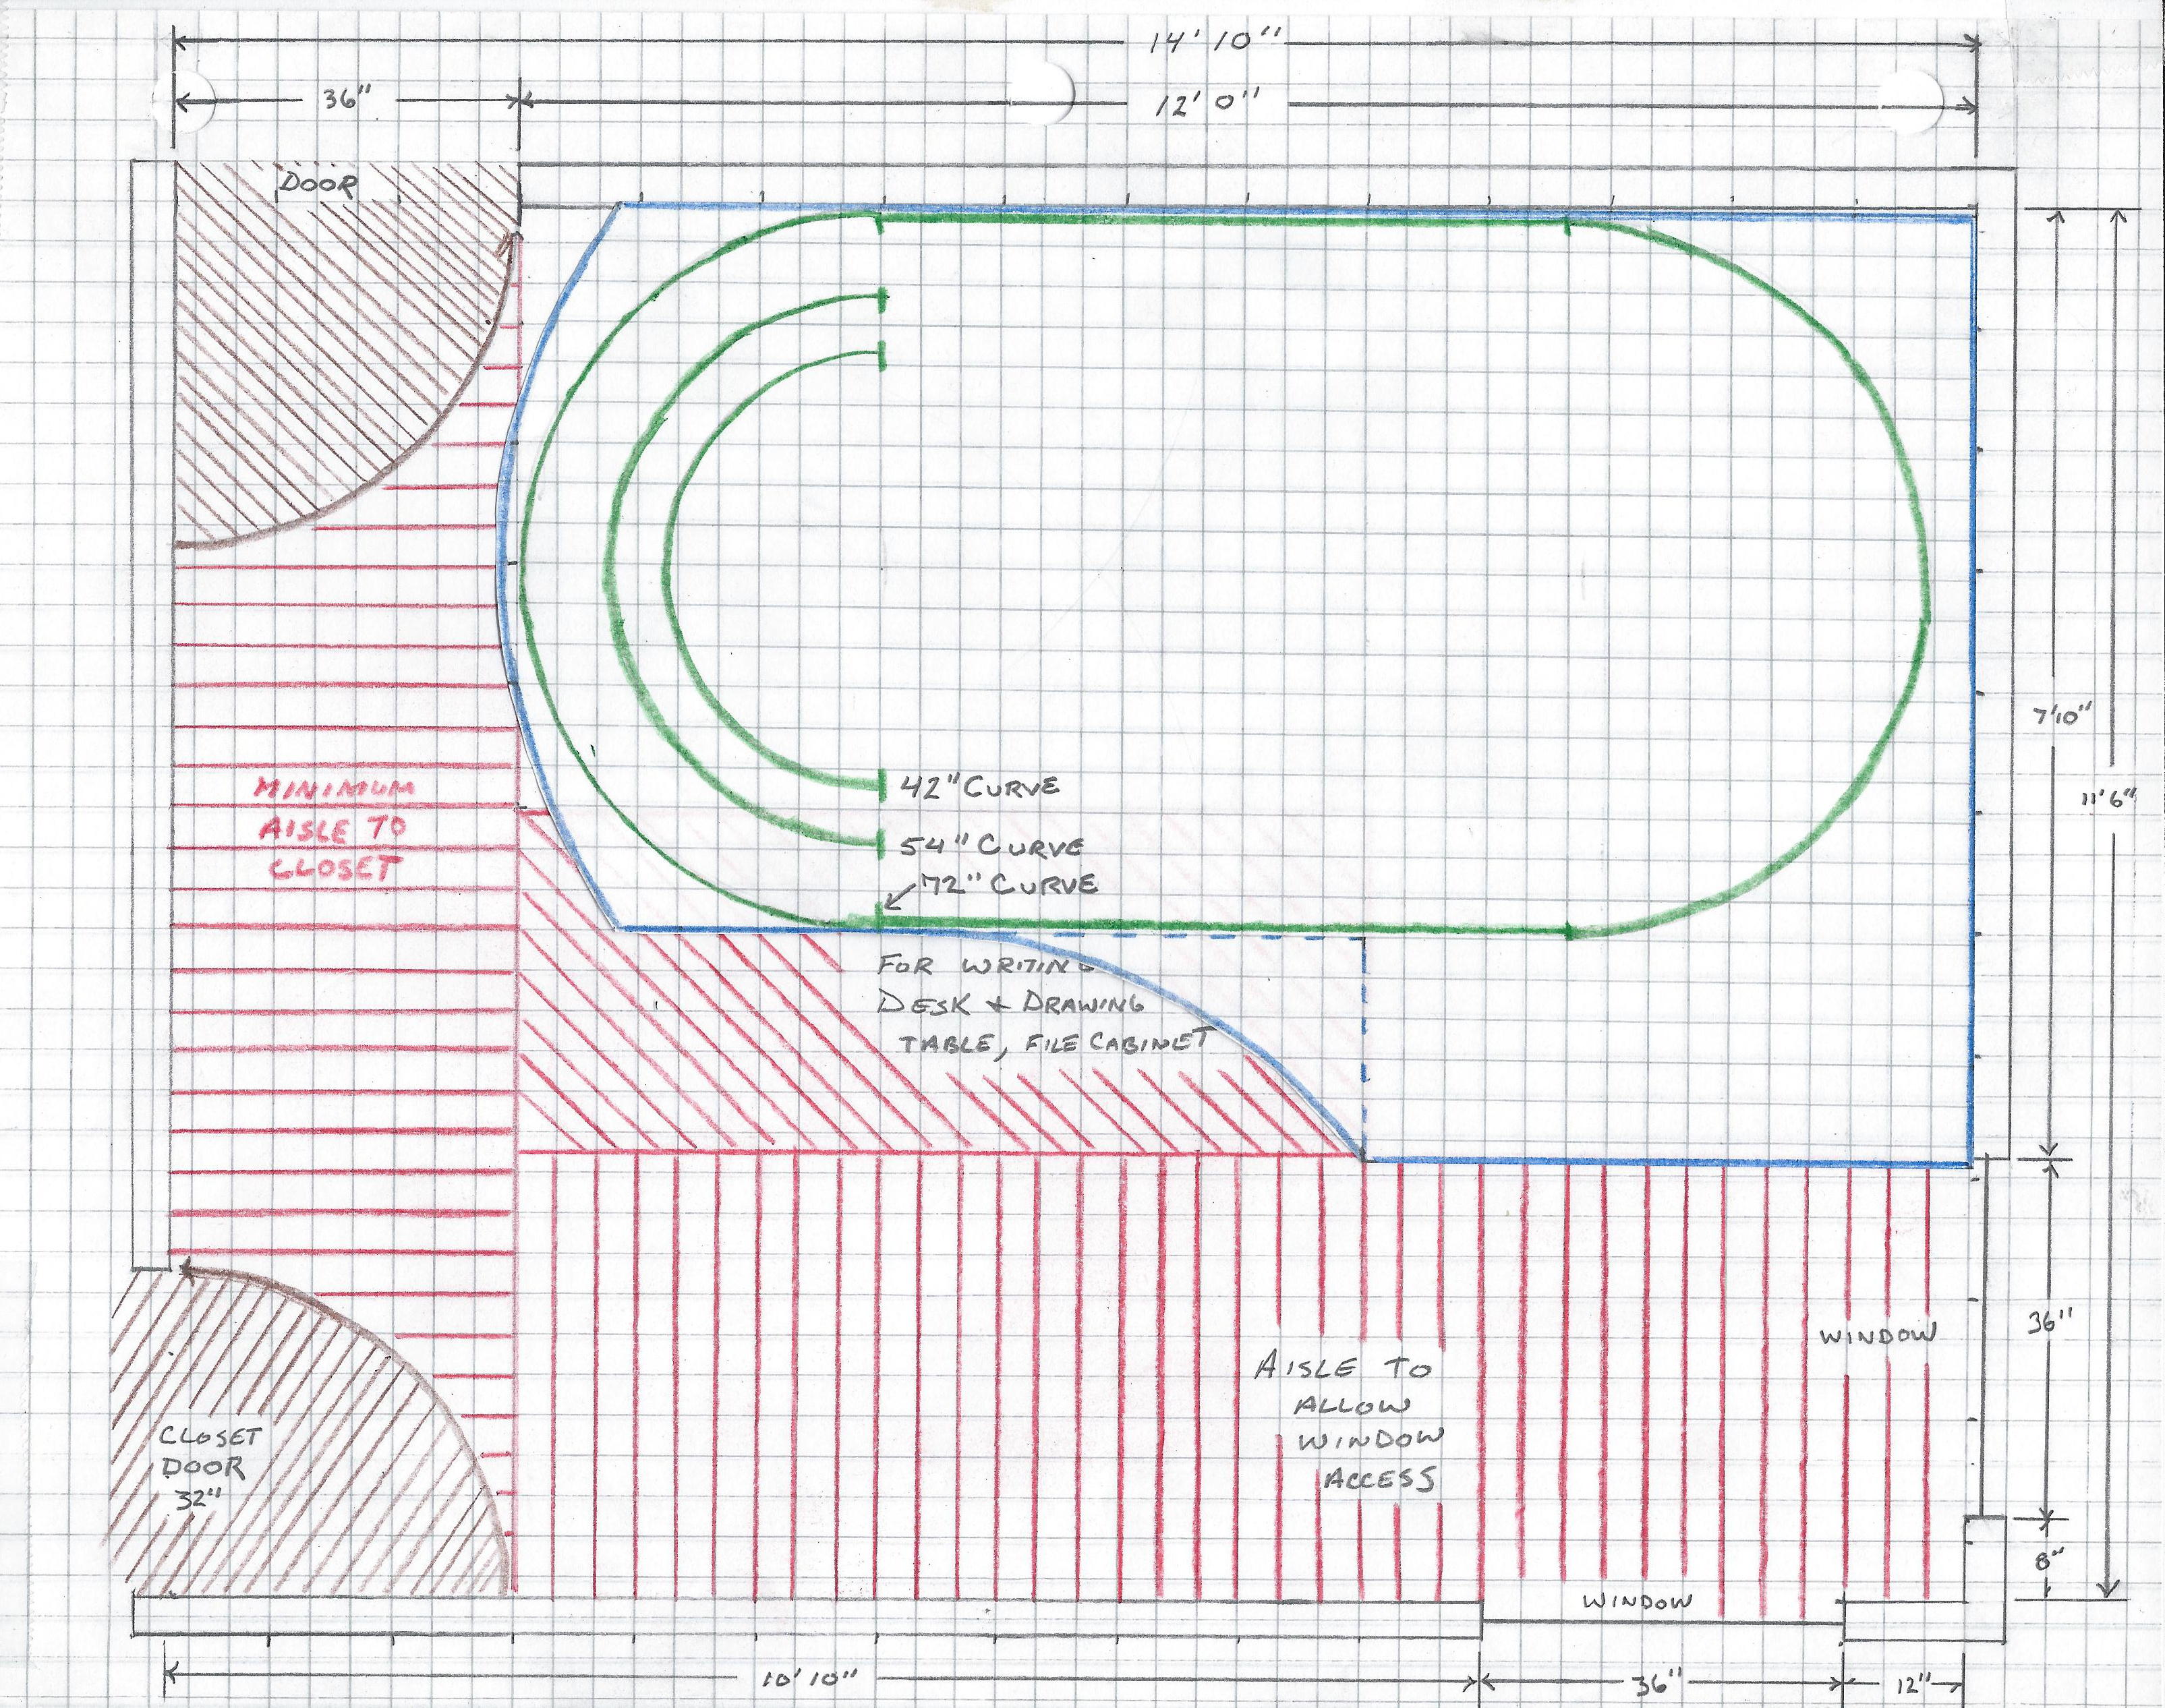
After deliberating between the two O gauge model railroad locations: garage or spare bedroom (discussed on Page 1), I decided to build it in the spare bedroom, which is 14′ 10” by 11′ 6” (see figure 1).
I made this decision based on the fact that it would require less prep work – the garage stall would need at least a temporary wall separating it from the cars. Also, the garage would require supplemental heating in the winter, and would be difficult to cool in the summer.
So, now that the location is chosen, how big of an O gauge model railroad layout can we cram into it? As you can see in figure 1, the only area that still needs to be accessible is the closet at bottom left. Luckily, it’s a straight shot from the bedroom door to the closet door, so we need only block off a 36-inch aisle. That leaves a 12′ x 11′ 6” area, essentially a square, for layout design. Not huge by O gauge standards, but nothing to sneeze at.
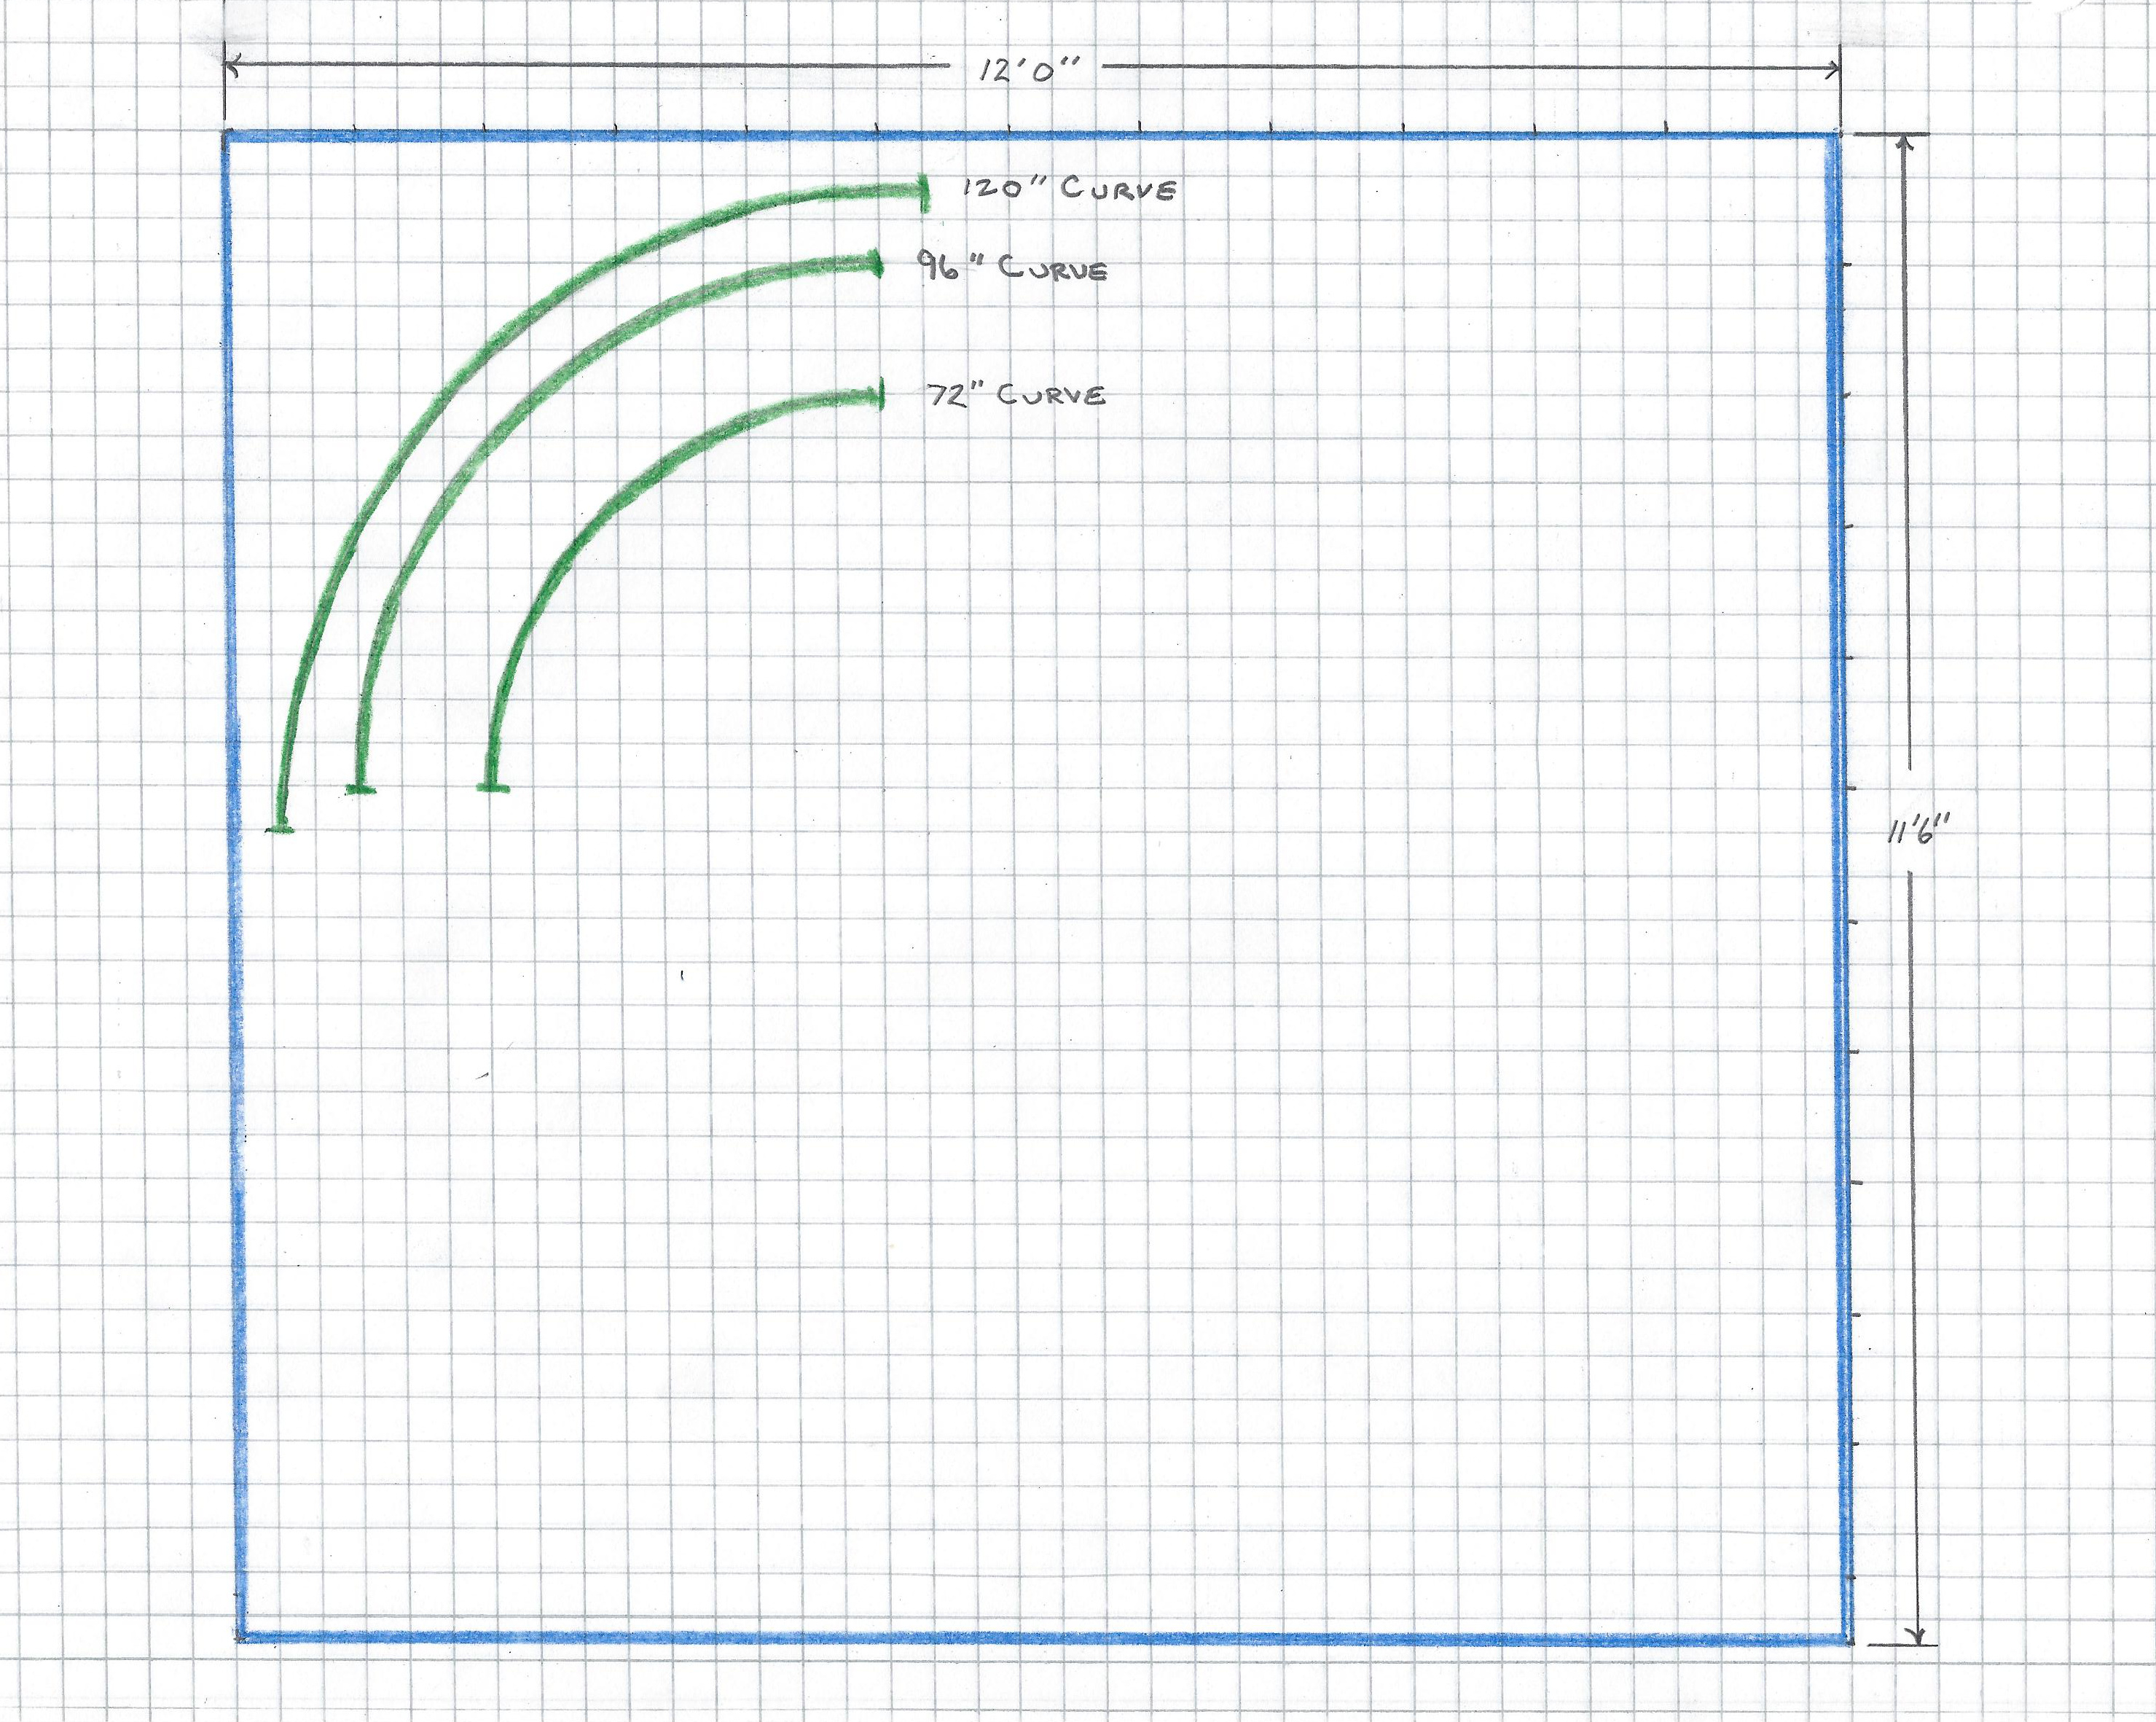
My first inclination was to completely fill the area with benchwork (see figure 2). The advantages of this would be that I could not only use 72” curves, but even broad 96” or 120” curves on the outer main line, which would improve the appearance of my scale 80-foot passenger cars (each about 20 inches long) as they rolled past.
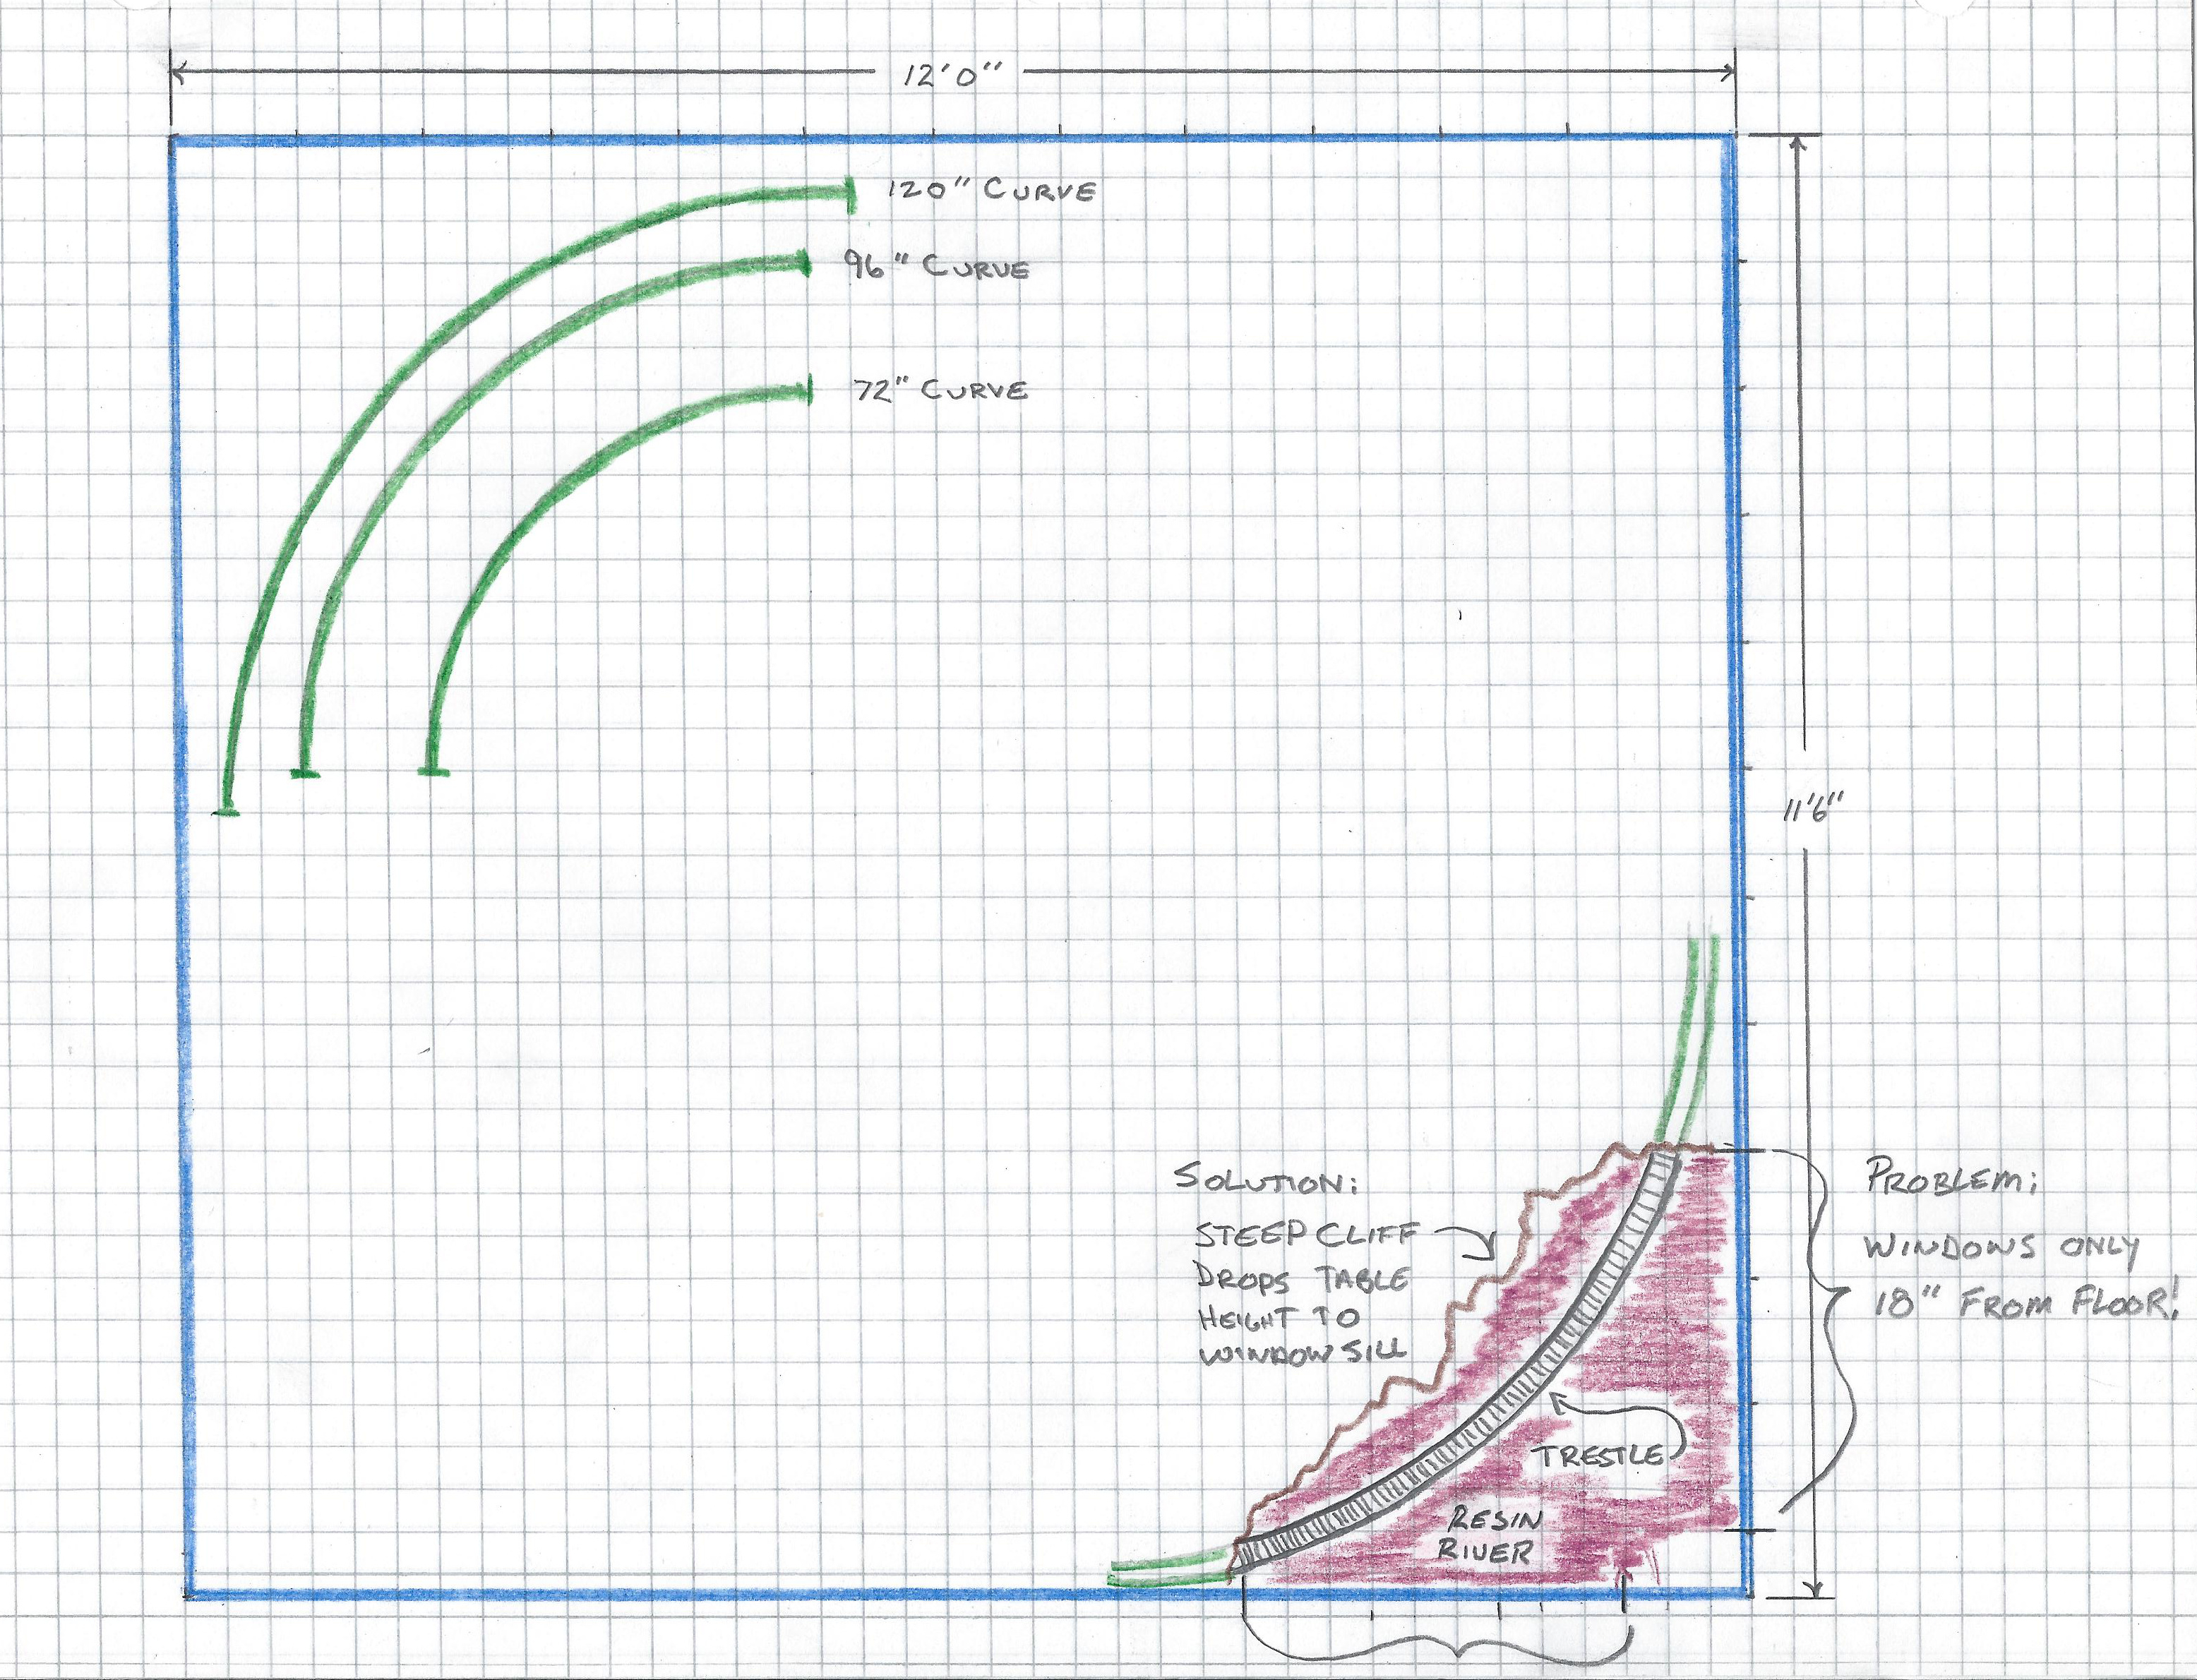
But there was a problem with this grand plan: The sills of the windows in the bottom right corner of the floor plan are only about 18 inches from the floor, much lower than the model railroad layout benchwork will be. I really didn’t want the layout bisecting the windows, or the framework supporting it visible from outside.
My first solution (see figure 3) was to lower the benchwork in that corner to window sill height, and create a depression that the train would traverse on a tall trestle. The difference in benchwork heights would be disguised with a desert canyon wall modeled in plaster after those in the area I live. That would look much more interesting from outdoors than a bunch of lumber support framing.
But, you wouldn’t really be able to see it from the aisle along the other side of the layout, where model railroad operators would stand. So, it would be a tremendous amount of work on a part of the layout only visible to the nosy neighbors who were looking in my windows. And, situated thus, would also be very difficult to work on. And, it would make it nearly impossible to reach the windows to open them. Not to mention there is a very nice view of the mountains out those windows.
So I decided that a more realistic plan would be to extend the aisle along the wall from the closet door to the windows. This decreased the size of the 11′ 6” side of the layout, leaving me with a 12′ x 8′ rectangle. My O gauge model railroad already suffered its first loss of right-of-way long before the first spike was driven!
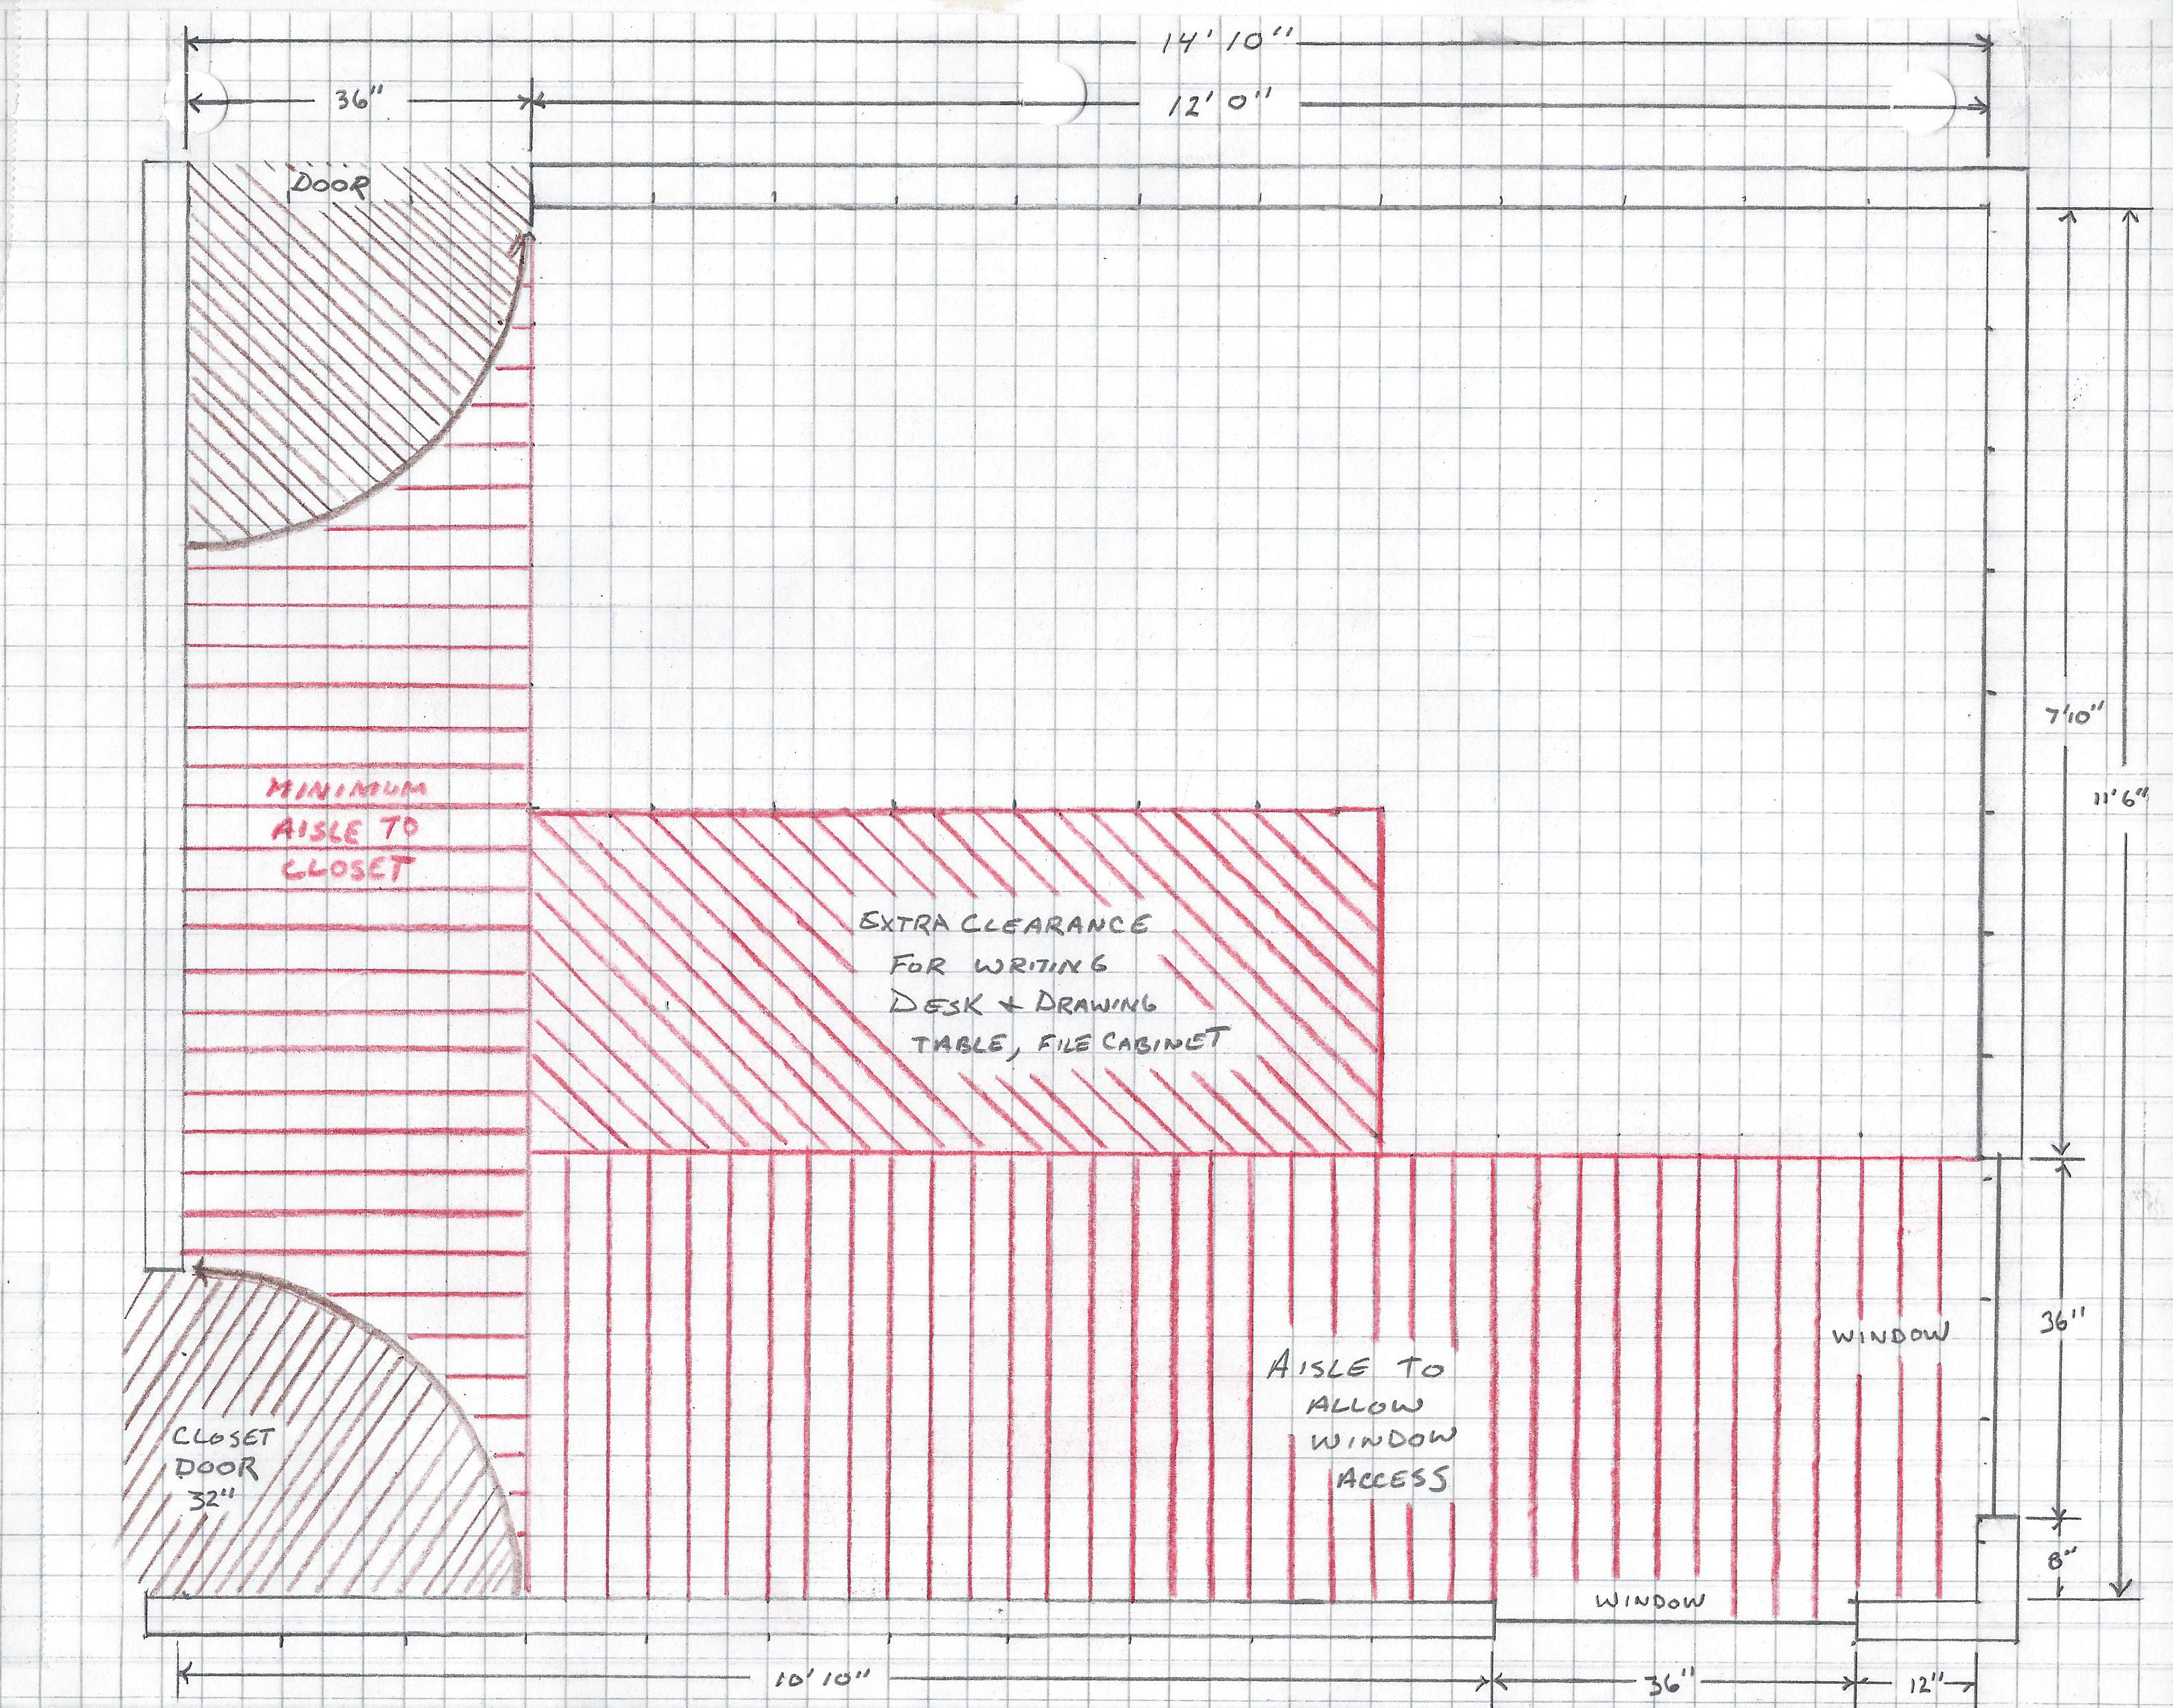
One more consideration: While I can do my drawing and writing in my detached wood-working/model-building shop during nice weather, in the middle of winter it would be a pain in the butt to run back to the house every time I needed to use the printer/scanner. I really needed a spot for my writing desk and drawing table in the house. So, rather than put that 44-inch wide aisle to the windows to waste, I would locate them there, along the edge of the model railroad layout.
But would 44 inches be enough room to hold a 30-inch deep desk and chair? Would I be able to roll the chair back from the desk without hitting the layout benchwork? To test, I got out a tape measure, and used sawhorses to simulate where the model railroad benchwork would be. I realized I would need another 24 inches of space behind the desk to be able to slide the chair back to where I could get in and out with a little leeway. Ideally, I needed about 30 additional inches of aisle width from the main aisle extending about 7 feet toward the window (see figure 4). This brought down the area for the layout to an L-shape 5 feet wide at each end of the “L.” It would still be 12 feet long on its longest side by 8 feet on the shorter leg.
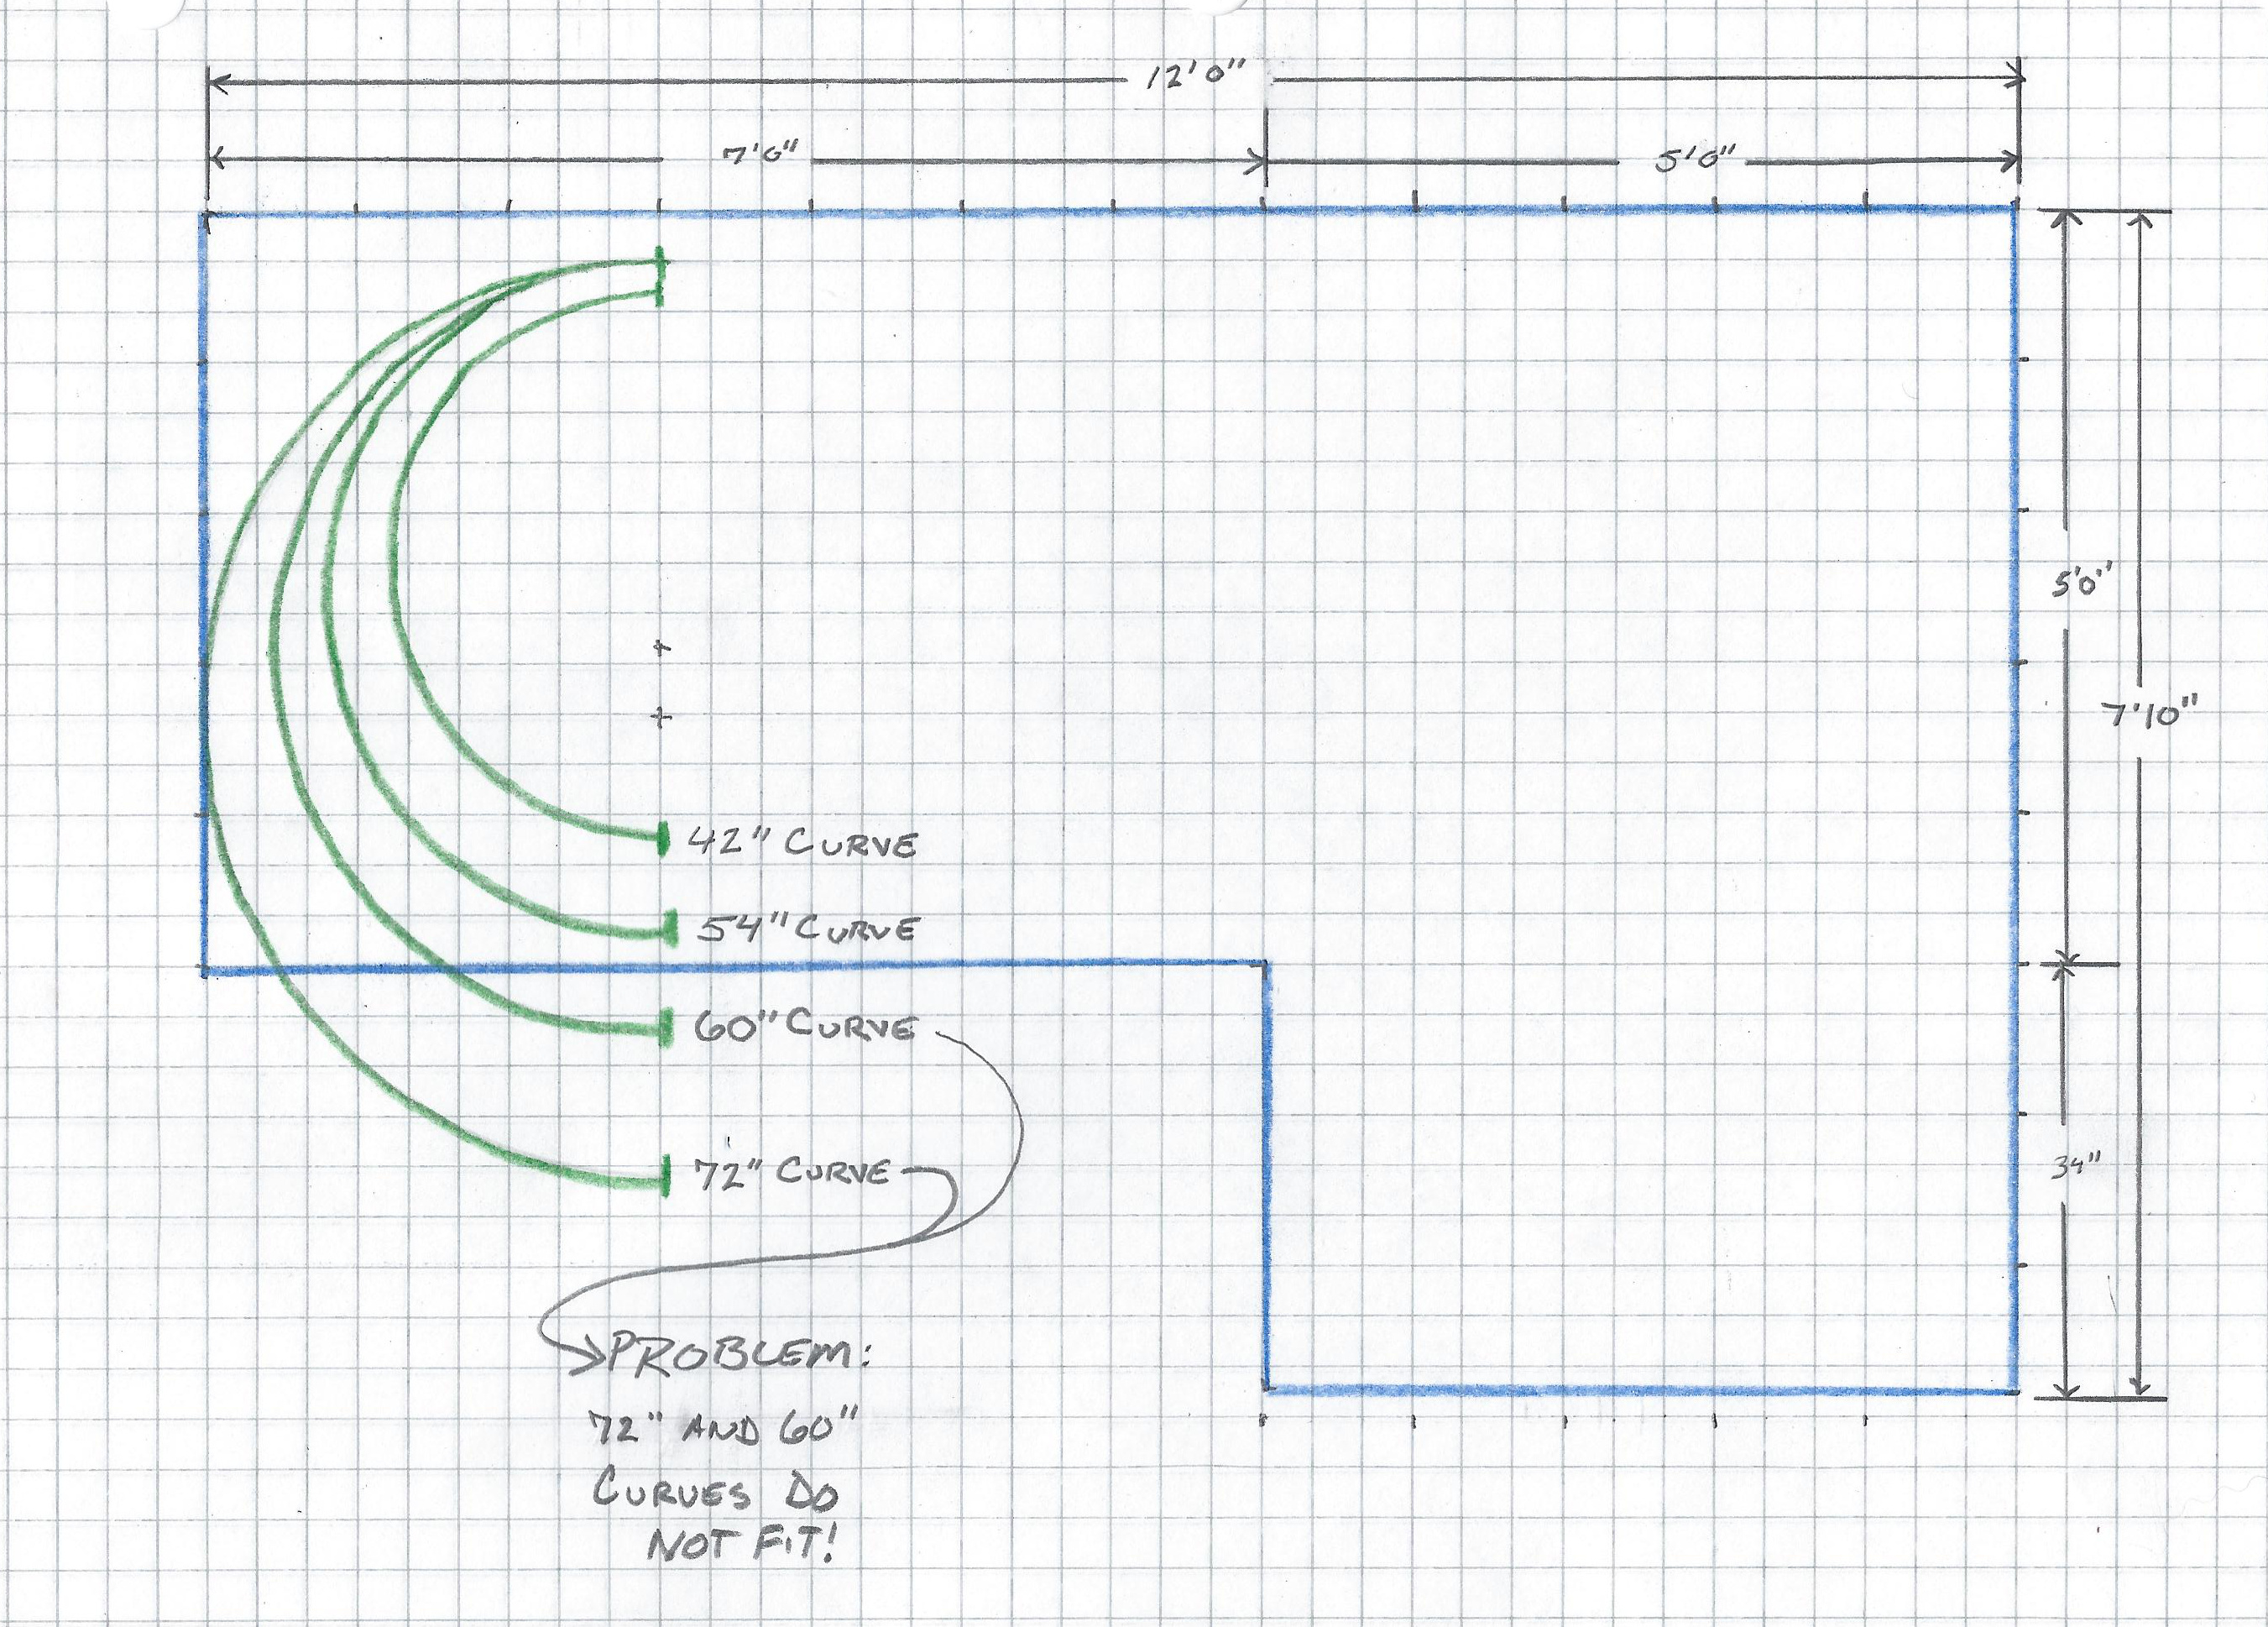
This decrease in size now brought me into direct conflict with one of the major points on my layout “wish list” on page 1: 72” curves on the outer loop for my long passenger cars (see figure 5). Now, not only wouldn’t 72” curves fit, even 60” curves would probably be out of the question. I was now limited to 54” and 42” curves, still a lot better than the 27” curves of standard O-27 gauge track, or the 31” curves of traditional O gauge tubular track, but not what I wanted.
So, I started fudging the size of the layout to see how much bigger I could make it without resulting in bumps and bruises while trying to get into or out of my desk. That’s when I remembered my holiday model railroad layout platform wasn’t square. To maximize the space I could use without creating toe-jamming corners that would stick out too far out from under the tree, the front of the platform is curved. It is 48” wide in the middle, but narrows over an arc to only 38” at each end.
This can easily be accomplished by making the layout benchwork slightly smaller than the actual size, and cutting the plywood top to the size you want the table to be. I wouldn’t recommend overhanging the layout framework by more than about 8” to 12” if you use 3/4” plywood for the top; no more than about 6” if you use 1/2” plywood. If you go this route, you can cover the edge of the plywood with a strip of medium-density fiberboard to give it a finished look. I’ve seen some layouts where the MDF edge is cut to follow the changing terrain height and painted flat black to give it a very theatrical effect.
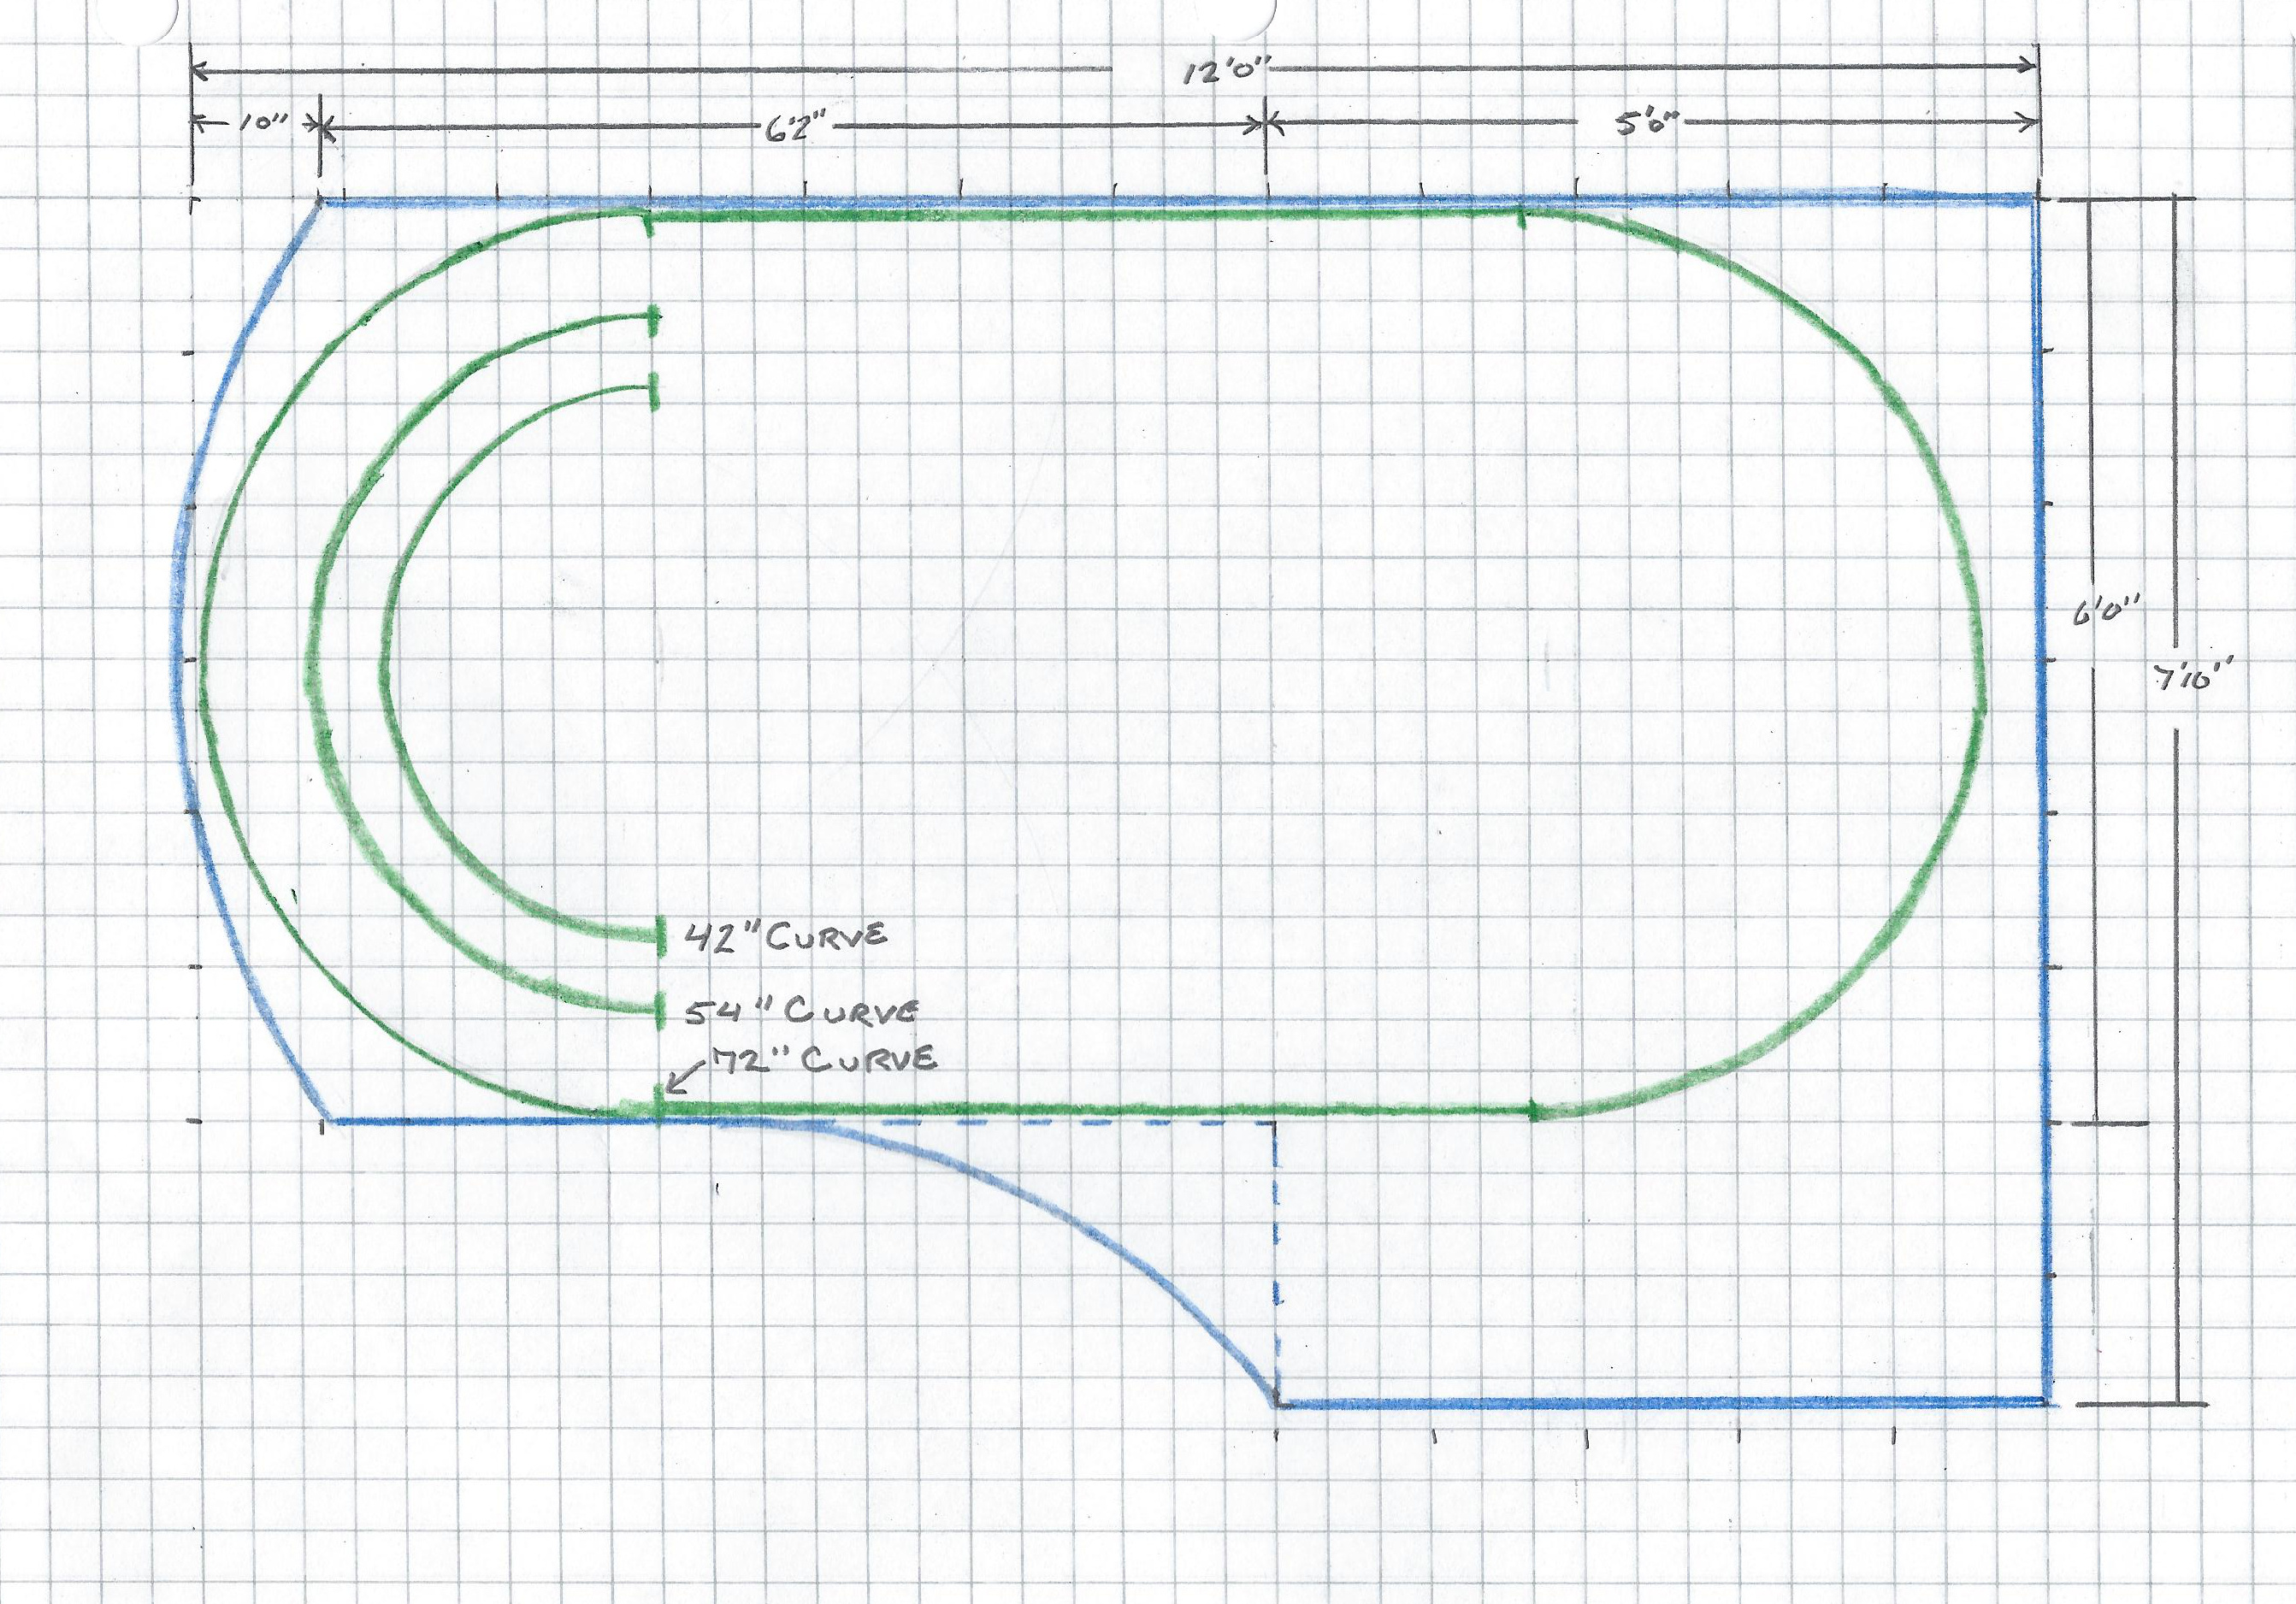
First, I experimented with shaping the edge of the table to a radius just larger than a 72” curve. This created a nice shape without any shoulder-catching corners to bruise someone standing up from the desk. I shaped the top to curve out the other way to join up with the end of the short leg, too, to add a little more table space at the end of the extra clearance aisle, where I would need the space the least for maneuverability, but where a little extra right-of-way might come in handy for the model railroad.
While I was pleased with the result, my frugal side kept pointing out that the table I already had could be used for the curved end of the longer leg of the “L.” When it comes to spending money on model railroading, I would much rather spend it on stuff that runs on the rails, than on stuff that holds the rails up.
So, I redrew the layout using my existing curved table (see figure 6). this leaves me with a corner on which I’m sure I will eventually whack my elbow or shoulder, making me dance around holding it and cussing out my frugality, but, that’s somewhere down the line. It will easily save me enough money now to afford a used freight car at the next model railroad expo.
It will be a squeeze to get the 72” curve on a 73 1/2” table, but I think it will work. I may end up having to bring the curve to the short leg down the length of the long leg to add a couple inches. We’ll see.
To see how much of my chair-backing space I’m going to lose, I put the layout drawing over the floor plan of the room (see figure 7). You can see I’m losing a good bit of shoulder clearance, but I think it’s a compromise I’m willing to make to keep my 72” curves. I may change my mind after enough bruises.
While I was able to get the 72” curves on the layout, I can’t fit anything more than a simple oval of track using those curves. When we get to constructing the model railroad layout and laying track, I’ll show you a few tricks to hide the fact the train is just chasing its tail around a loop. I’m still finalizing what to do with the smaller diameter track routes, so that will have to wait until down the road, but I’m sure at this point this is the right size for my spare bedroom O gauge model railroad layout.
Up next is building the model railroad benchwork!
Or should I design the track plan to see if I need to adapt the benchwork to it? Hmmmmm …
Speaking of a track plan, what kind of track should I choose? There are a number of different track manufacturers, and each manufacturer has different product lines, most of which will not work together without an adapter. So, the most straightforward way would be best to pick one kind of track and stick with it.
Why is it important to decide what kind of track I’ll use now? Different types of track have different “geometry,” that is, one manufacturer’s straight track may not be the same length as another manufacturer’s. And some manufacturers offer a wider variety of curve diameters, switch sizes, crossings, and other special track pieces. So the brand of track will affect the track plan based on what the sizes of the different pieces are, and one manufacturer may offer special tracks you need for a specific design that you cannot get with another product line. To learn more about track, go to our Choosing Track for an O Gauge Model Railroad page.
If you want to dig right in to model railroad design, visit our Basic Model Railroad Layout Types page.
Go to:
Page 1: Deciding on a Location for your Model Railroad Layout
Page 3: Building Benchwork for Your Model Railroad Layout
Page 4: Designing trackwork for your model railroad layout
Page 5: Building roadbed for your model railroad layout
Please Support FreeModelRailroadPlans.com
FreeModelRailroadPlans.com is entirely user supported. If you find something of value here, please “pay it forward” and help us keep the site operating by a secure donation through PayPal (PayPal account is not required), or by shopping with our advertisers.
Thank you for your support!