Many Options Available for Model Railroad Benchwork
Page 3: Simple, Strong Modular Design
for an O Gauge Layout
In a Spare Bedroom
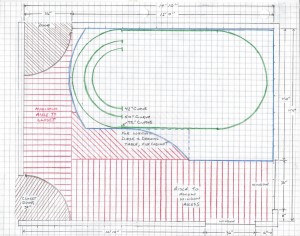
After settling on the location – a spare bedroom – for our O Gauge model railroad layout on our first page, and deciding how much room we had in the bedroom on our second page as shown in Figure 7a, we need to get busy designing the layout’s benchwork and trackwork.
The benchwork (how the tables are constructed) is somewhat dependent on the trackwork (how the model railroad tracks are routed around the tables}, and vice-versa. There are many methods of constructing benchwork from the basic 4×8-foot sheet of plywood on sawhorses for a transient layout, to building right into the structure of the room’s walls.
We opted for something toward the bottom of the scale: free-standing tables that, bolted together, create the overall size of the layout benchwork. It’s more stable (and semi-permanent) than the plywood & sawhorses route, but more easily torn down and moved than some of the more popular methods such as the “L-Girder” benchwork that is so popular with those building monster pikes around an entire basement.
Another advantage to our method is much of the table construction can be done in a garage, workshop, or other easily-cleaned space, and then simply assembled with simple tools in the carpeted spare bedroom. We built ours mostly on the driveway, which offered a smooth surface to make sure the table framework was square and flat.
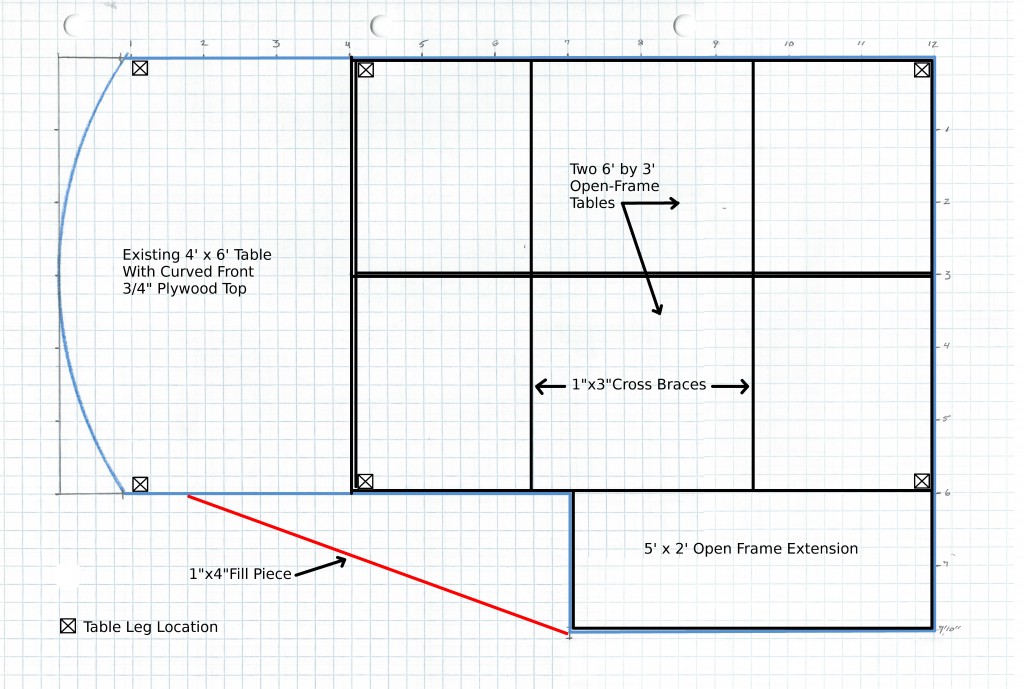
Before constructing the tables, we first had to decide how to break up our 12-foot by 8-foot L-shaped area into tables. We had to carry the tables up a flight of stairs that started with a 90-degree left turn and ended with a 90-degree right turn. As discussed on a previous page, we planned to use an existing 6-foot wide table with a curved front used as a base for our holiday layout under the Christmas tree. This table is outlined in blue at the left end of Figure 7b We could have created an 8-foot by 6-foot table for the remainder of the long leg of the layout, but it would have been very cumbersome to get up the stairs, so we divided it into two 3-foot by 6-foot tables, with a five-foot by two-foot extension at the bottom right. We abandoned the curved add-on joining the end of the short and long legs in favor of a diagonal piece that attached to the corner of the short leg and about one foot in from the corner of the long leg. This simplified construction and gave us a few more inches of table top, most likely at the expense of bruised shoulders, since this is the area available for a chair at the drawing table.
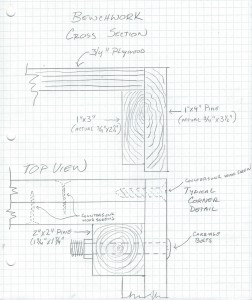
Once table shapes are determined, we moved on to actual table design. This could be as simple as a 1×4 box with a 1/2” plywood top screwed down to it – although for O Gauge trains, 2x4s and 3/4” might be a better choice for strength. Since I already had the end table complete, I decided to follow that design, with the plywood top flush sitting down inside the framework for a more finished look. Our framework is 1x4s backed up by 1x3s shown in the top illustration of Figure 8. This allows the plywood to rest on the 1×3, a much sturdier construction than just screws driven through the 1x4s into the edge of the plywood. The bottom illustration in Figure 8 shows a top view of how table legs are fastened into the corners. Locations of the six table legs are marked on Figure 7b.
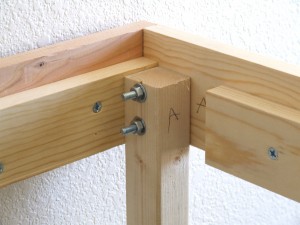
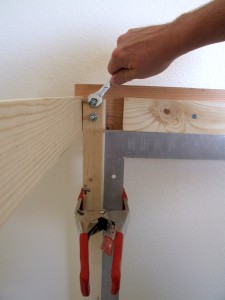
Figure 9 shows a photograph of the corner detail depicted in the lower illustration in Figure 8, before the plywood top is put in place. Since the table legs are fastened on with carriage bolts, all the drilling for these can be done in your work area, and the legs bolted on in the bedroom, further reducing sawdust cleanup. Use a carpenter’s square as shown in Figure 10 to make sure the leg is at a 90-degree angle to the table before tightening the carriage bolts.
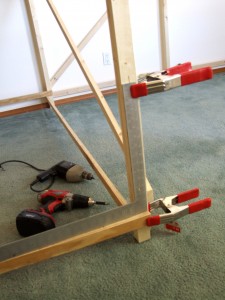
Use a cross piece cut to the distance between the legs at the top to make sure the legs are that same distance apart at the bottom. Use your carpenter’s square as shown in figure 11 to keep everything at 90-degree angles. Add diagonal braces to stiffen up the legs once everything is square. This construction is so solid that it can hold the weight of a 200-pound man and still feel rock-solid.
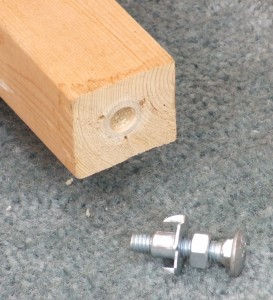
Another problem is getting the table surface level. Even if your carpentry skills are perfect, chances are your floor is not. Figure 12 shows a neat trick to create floor levelers for each table leg. Simply drill a hole in the bottom of each leg, and fit it with a carriage bolt that has a blind nut and a hex nut. I drill the hole the diameter of the carriage bolt, and then use a slightly larger bit to open up the top of the hole for the blind nut. Then, run the bolt in or out of the blind nut until the top of the table is level. Once everything is level, tighten the hex bolt up against the blind nut to lock it at that height.
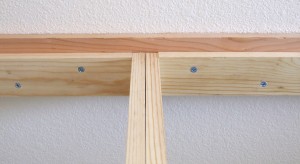
Figure 13 shows the far right end of the long leg (as seen in Figure 7b). Since there are no table legs here, where the two 3-foot tables join there is a possibility of sagging.
To prevent this, the 1×4 is the entire 6 feet of table width. It is held in place with wood screws every six inches.
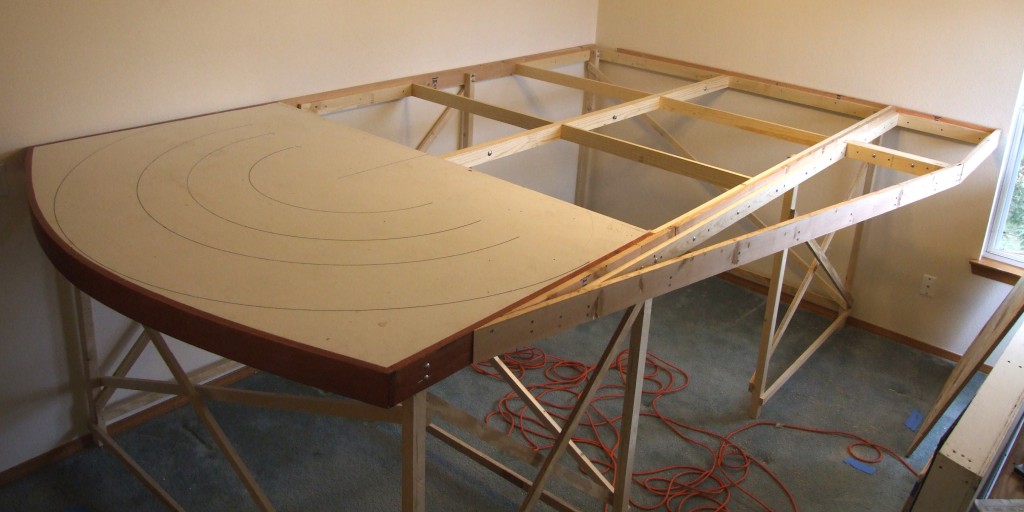
Figure 14 shows the final benchwork. At left is the table that was already built, with plywood top already installed. The rest of the benchwork is new construction, ready for the table top on the open framework.
Go to:
Page 1: Deciding on a Location for your Model Railroad Layout
Page 2: Deciding How Much Space to Give Your Model Railroad Layout
Page 4: Designing trackwork for your model railroad layout
Page 5: Building Roadbed for your model railroad layout
Please Support FreeModelRailroadPlans.com
FreeModelRailroadPlans.com is entirely user supported. If you find something of value here, please “pay it forward” and help us keep the site operating by a secure donation through PayPal (PayPal account is not required), or by shopping with our advertisers.
Thank you for your support!
One thought on “Benchwork for an O Gauge Model Railroad Layout in a Spare Bedroom”