Making Your Model Railroad More Fun
Simple additions greatly enhance the operation of your O gauge model railroad layout
Once you get your first O gauge train set you imagine hours of enjoyment hauling freight across the country behind a smoking locomotive.
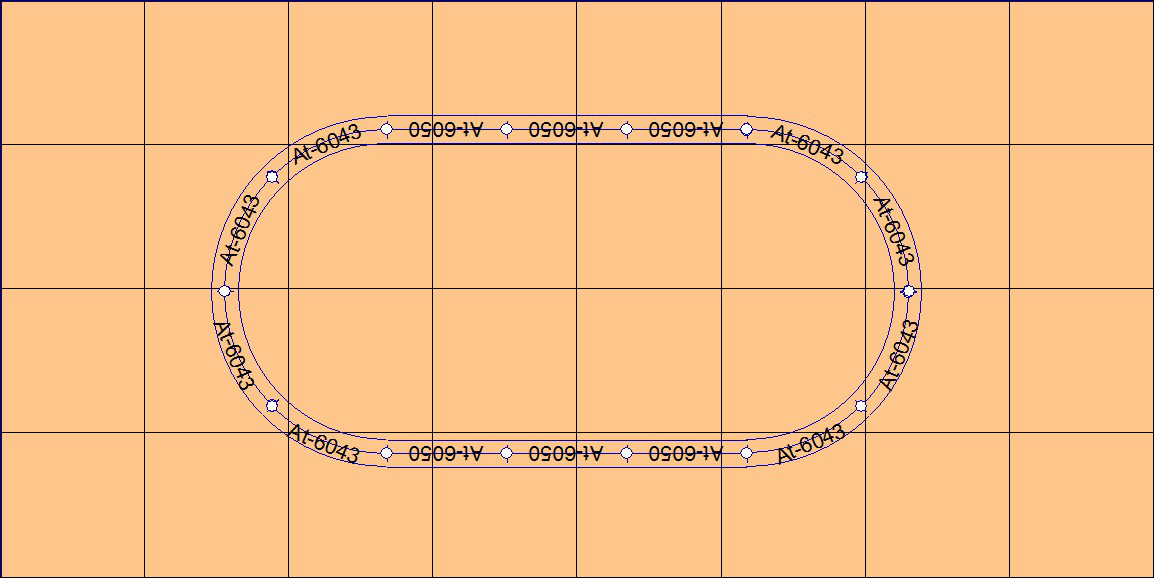
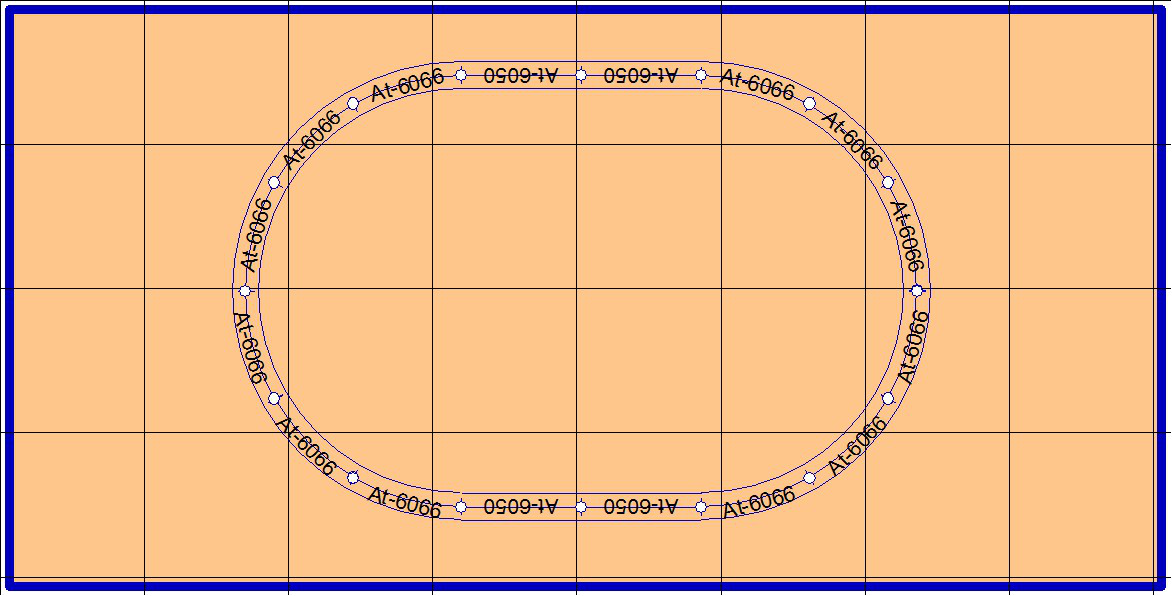
Then you set up the small 27-inch (figure 1) or 36-inch (figure 2) oval that comes with the set, and watch your train chase its tail. That’s interesting for a while. What now? It’s off to the local hobby shop to buy more track and expand your iron horse empire. But, there are so many pieces of track, how do you choose which ones to buy?
First, make sure you buy the same brand and type of track as your train set. Most brands will not join to other brands without an adapter piece between them. Also, if you are just getting started, you may want to decide if you want to stick with the brand of track that came with your set. If you only have enough track to make a simple loop, it’s a lot easier to switch track brands now, than later, after you’ve bought hundreds of dollars worth of additional track. Ask you local hobby shop about their opinions of the various track brands and styles available. They all have pros and cons, so this is a good time to study them and see if you want to change.
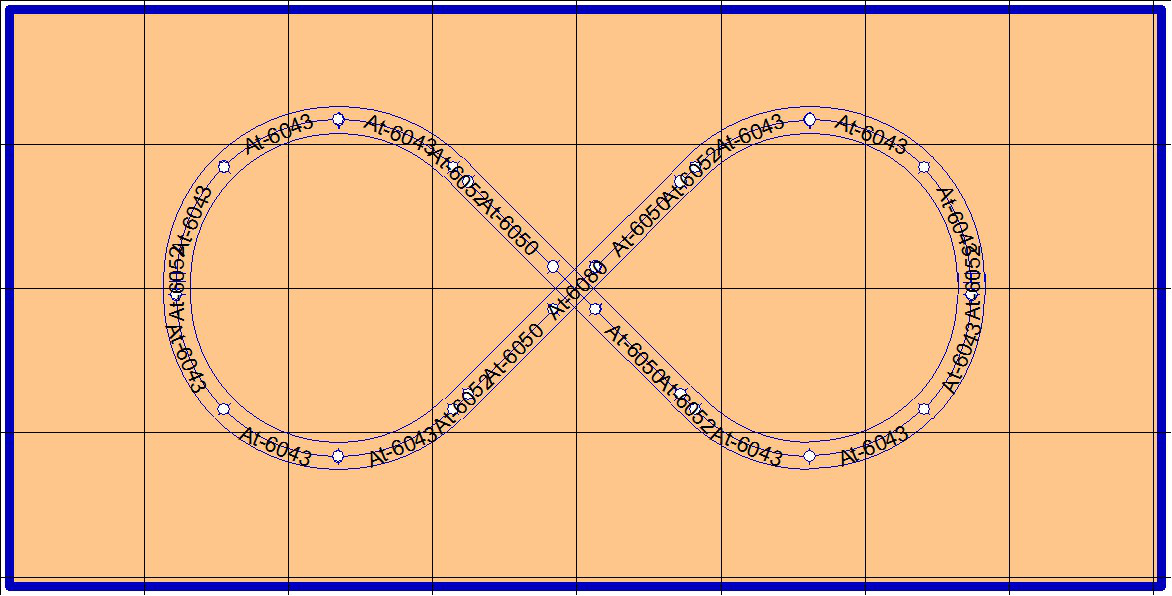
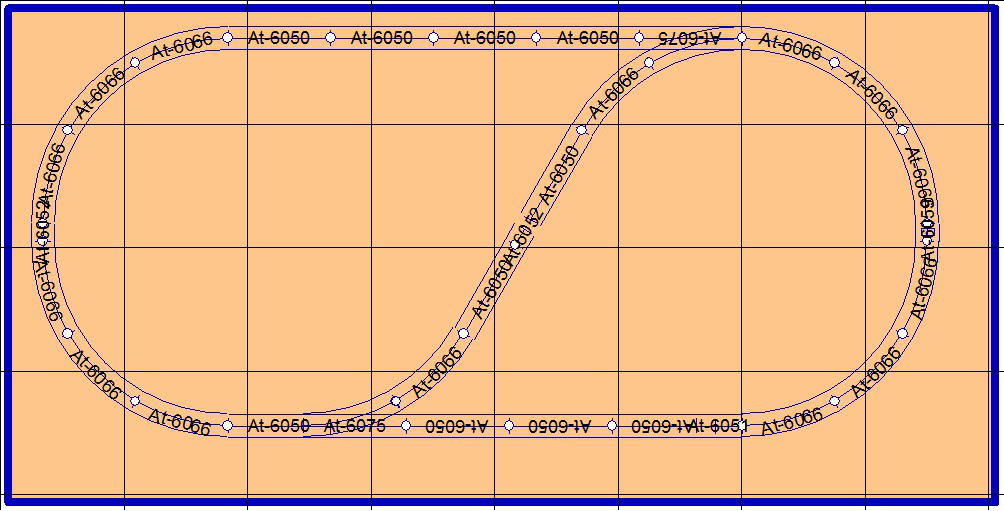
If you decide to stick with what you have, all you have to do is add a couple more curves and a crossing, and you now have a figure 8 (figure 3: This will fit on a 4×8 sheet of plywood with 27” track; 36” track will need to be a bit longer than 8 feet). As your train runs around this track it seems to reverse itself, and crosses back and forth. Interesting for a bit longer, but with limited operational features, this layout still it loses its luster after a while. There has to be a way to make a model railroad layout do … more. What to do next? There is a different kind of track piece that is the logical next step in creating your model railroad empire: The switch.
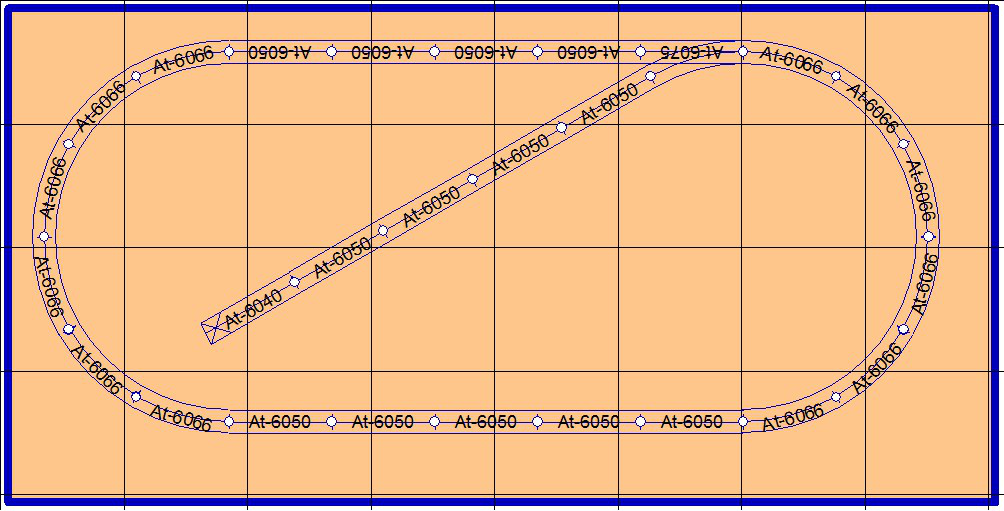
Adding a switch (or turnout, as they are sometimes called) will probably add the most operating fun for the money. Add a single switch and you have a spur siding (see figure 4). Now your trains have a place to go, just like a prototype railroad. You can pick up and drop off freight cars on the spur siding to serve an industry that is adjacent to the track. If there are several industries that use the siding, you may have to juggle the cars in your consist to get the correct ones in front of the correct loading dock, giving your train crew even more work to do. For instance, if you need to drop the fourth car in your train at the last industry on the spur, and the fifth car at the first industry, you are going to have to uncouple and leave the fifth car on the main while you spot the fourth car on the siding. Then you can return for the fifth car, and spot it at its industry.
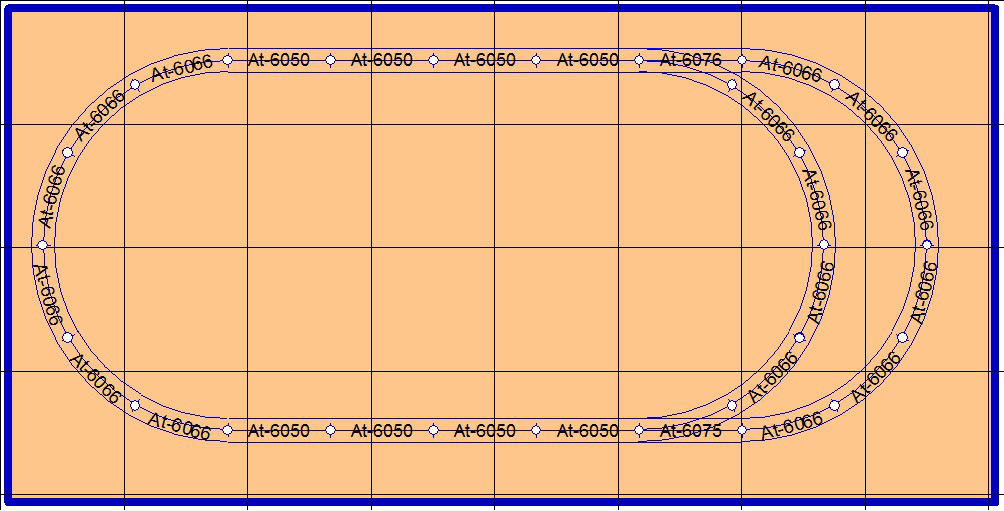
Add a second switch at the other end of the spur siding (see figure 5), and you have a multiple use track that serves as a siding with two entrances. You can back in from the top switch to place an “empty” car, then go around the loop and later back into the bottom switch to pick up the “full” freight car. It also works as a “reverse loop.” That is, a train traveling counter-clockwise around the track can enter the reverse loop, and come out the other side traveling clockwise around the layout. Once the train has gone through the reverse loop and is traveling clockwise, you would need another reverse loop set the opposite way of the first to turn the train again.
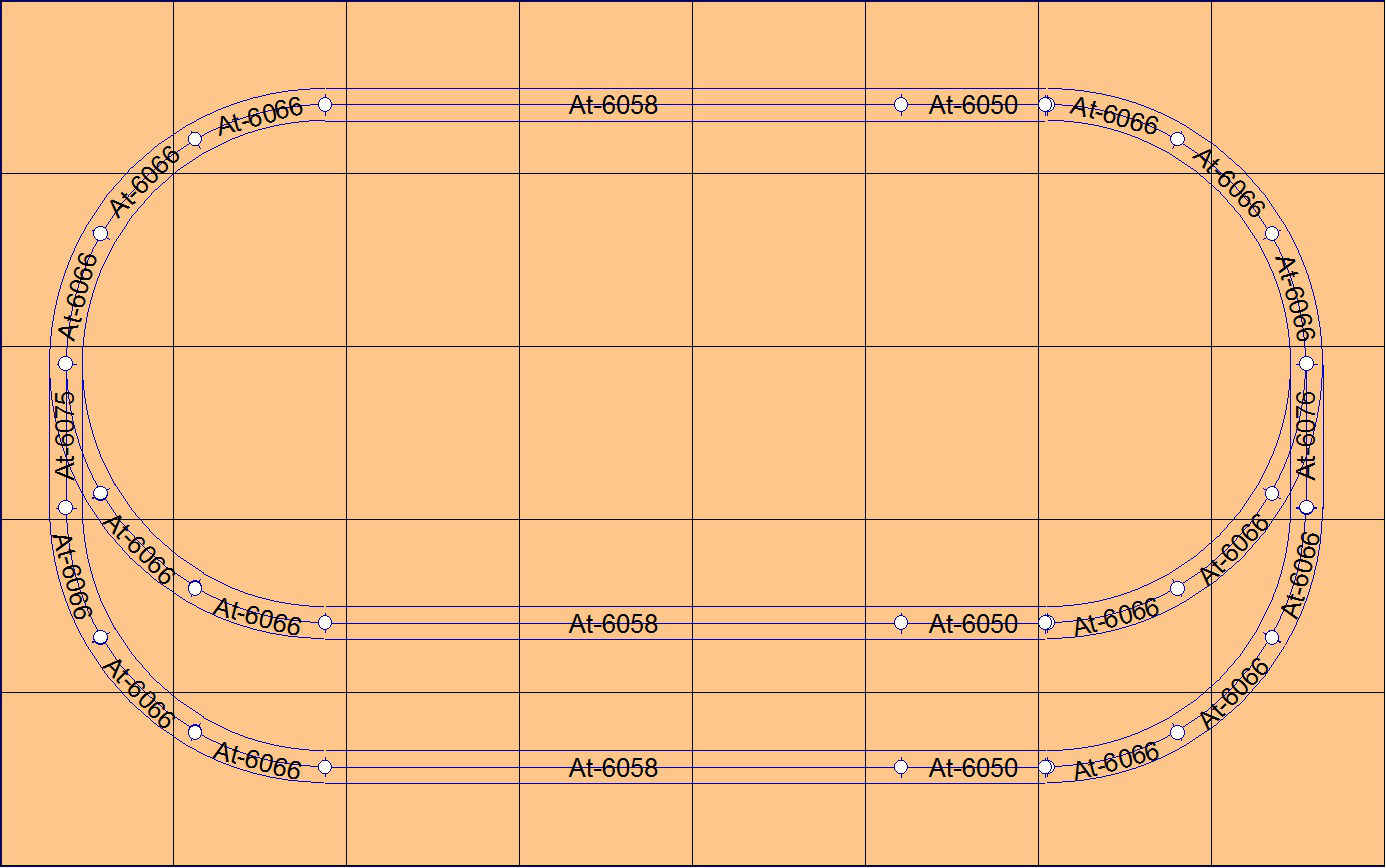
You can also use two switches to create a passing siding (see figure 6). By using insulating pins to connect the tracks coming off the switches, you can wire the passing siding and the section of the mainline adjacent to it to a toggle switch that will turn the power on or off to those sections of track, allowing one locomotive to park on the siding while the other travels past it (We’ll have more on how to wire your layout in future articles). If you want a passing siding long enough to hold an entire train, you can move the switches to the curves (see figure 7). With 36” curves this layout will require a space of about 5×8.
At this point, you should probably think about building a semi-permanent train table so you don’t have to disassemble your track at the end of each operating session. The easiest method is to just put a 4-foot by 8-foot piece of plywood on a pair of sawhorses. For O gauge trains, we recommend 3/4-inch thick plywood. This will work for a while, but without a frame to stiffen it, even this thick plywood will eventually warp. See our O gauge model railroad layout project benchwork page for more information on building your train table.
For me, half the fun of O Gauge model railroading is planning what to do next to make your layout even more interesting. As I showed here, it doesn’t take a big change to add a lot to your model railroad. And it doesn’t end with track. There’s a lot of other accessories to choose from. Lionel, MTH, Atlas, and many other companies manufacture accessories ranging from buildings to create an urban environment to operating accessories that can add the action of unloading and loading train cars on your railroad.
More simple layouts still to come!
Please Support FreeModelRailroadPlans.com
FreeModelRailroadPlans.com is entirely user supported. If you find something of value here, please “pay it forward” and help us keep the site operating by a secure donation through PayPal (PayPal account is not required), or by shopping with our advertisers.
Thank you for your support!
Very helpful layout discussion. Do Figures 3-7 apply to O Gauge with 036 curves? That is, can you layout the designs on a 4×8 bench? Thanks.
Thanks for the feedback. Figures 3-6 would all fit on a 4×8 sheet of plywood using 36″ curves. Figure 7 would require a 1′ addition to the 4′ side for a 5′ x 8′ layout.
What do you have available in O gauge FINISHED (buildings, roads, people, etc) photo layouts
As you might surmise from the name of the site – https://www.freemodelrailroadplans.com – we specialize in plans for model railroads, and don’t usually do photo spreads of finished layouts. However, if you or any of our other readers would like to contribute photos of their layouts, we would be more than happy to post them in a photo gallery. Send a note via the contact page, and we’ll send you an email address.
Hello,
Like to offer a Lionel O27 4×8 plan (document)
Please send the email address.
Thank you
Thanks for the offer! Please send me a message on the Contact Us page, and I’ll reply with my email.
Thanks for the ideas. I am starting from scratch and this helped me tremendously.